
Meta Catalog Ad Templates: The Complete Guide to Designing Catalog Ads in Ads Manager
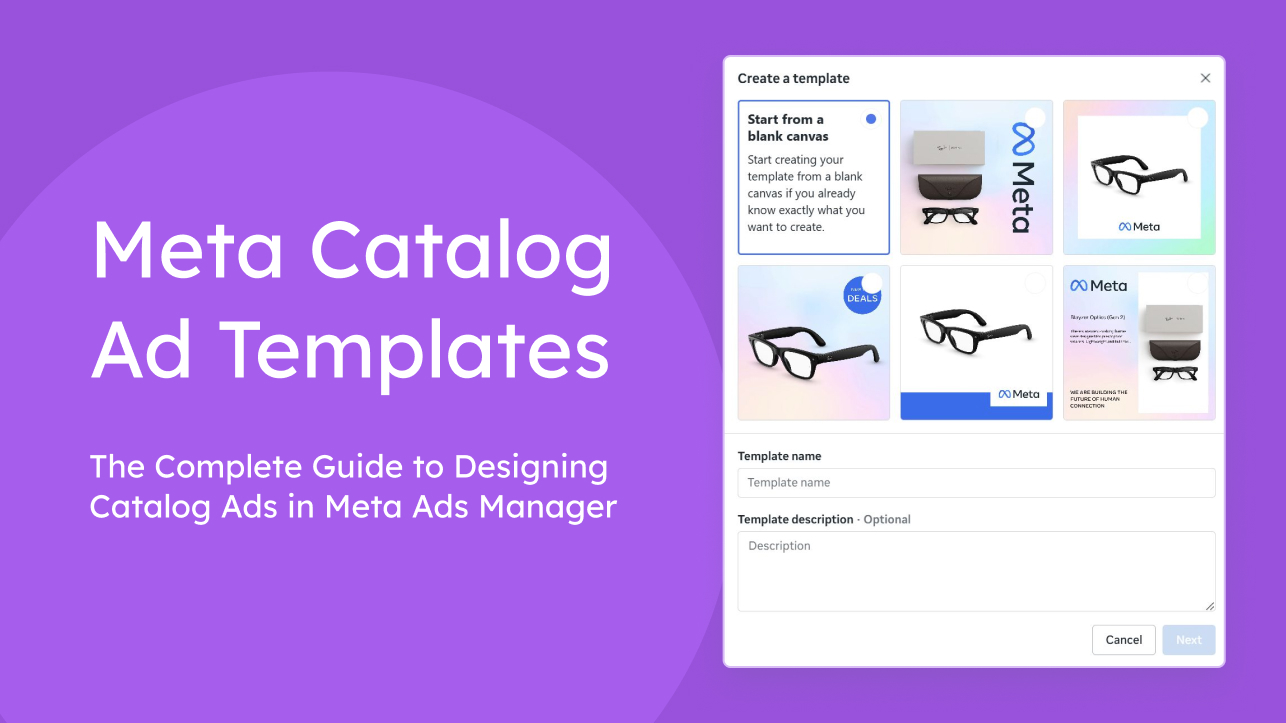
You can now design your Catalog Ads directly inside Meta Ads Manager.
Meta has launched Templates, a built-in design builder for Catalog Ads (the format many marketers still know as Dynamic Product Ads). Instead of running bare product images on white backgrounds, you can now build custom branded layouts with your own text, colors, logos, and dynamic product info pulled straight from your catalog.
Here’s why that’s a bigger deal than it sounds: most eCommerce marketers don’t know you can change the design of Catalog Ads at all. Their ads look exactly like every competitor’s. Product on white. Nothing else.
That excuse is now gone. The design tool is sitting right there in Ads Manager, and it’s free.
We’ve been building templates with the new feature, and in this guide we’ll show you exactly how it works, what to put in your templates based on data from billions of Catalog Ad impressions, and where the native tool stops short.
Table of contents
- Meta Catalog Ad Templates at a glance
- What are Meta Catalog Ad Templates?
- Why should you design your Catalog Ads?
- How to create a Catalog Ad template in Meta Ads Manager (step by step)
- Step 1: Find the template builder in Ads Manager
- Step 2: Create a new template
- Step 3: Get to know the template editor
- Step 4: Build your design with layers
- Step 5: Get your layer order right
- Step 6: Add 4:5 and 9:16 versions of your template
- Step 7: Connect your template to your ad
- How to build multi-image Catalog Ad templates
- Copy, rename, and delete: managing your templates
- Advantage+ Creative enhancements: the one setting that overrides your templates
- What to put in your Catalog Ad template: design choices backed by data
- The design elements that improve Catalog Ad performance
- Prospecting vs. retargeting: adapt your template to the funnel stage
- High-end vs. affordable: adapt your template to your brand type
- Catalog Ad templates by industry: fashion, electronics, home, and more
- Example: a strong beginner Catalog Ad template, layer by layer
- Why you should build more than one template
- What Meta Catalog Ad Templates can’t do
- From Dynamic Product Ads to Templates: how Catalog Ad design evolved
- Meta Catalog Ad Templates: frequently asked questions
- Are Meta Catalog Ad Templates free?
- Do Catalog Ad Templates work with Advantage+ Creative enhancements?
- Which aspect ratios do Meta Catalog Ad Templates support?
- Do Catalog Ad Templates work with Collection ads?
- What is the difference between Catalog Ad frames, overlays, and templates?
- Can I use my own brand fonts in Catalog Ad Templates?
- Do Catalog Ad Templates work with Advantage+ Shopping campaigns?
- How are Meta Catalog Ad Templates different from dedicated Catalog Ad design tools?
- Start designing your Catalog Ads today
Meta Catalog Ad Templates at a glance
- What it is: A free, layer-based design builder for Catalog Ads, built directly into Meta Ads Manager and Commerce Manager.
- Where to find it: At the ad level in Ads Manager, under “Add an overlay,” choose “Template.” You can also create templates in Commerce Manager under your catalog.
- Why it matters: Designed Catalog Ads perform better. Across Confect’s A/B tests in 268 eCommerce companies, designed Catalog Ads delivered a median 31% higher Return on Ad Spend than bare product images.
- The catch: Advantage+ Creative enhancements override your template designs. Turn them off, or Meta’s own AI will quietly undo your work.
- The path forward: Meta’s tool is the right place to start, especially for smaller brands. When performance becomes the goal, dedicated tools add what top performers rely on: Design Rules, Video Catalog Ads, and designs that actually look like your brand.
What are Meta Catalog Ad Templates?
Meta Catalog Ad Templates is a layer-based design builder inside Meta Ads Manager and Commerce Manager. It lets you create custom branded layouts for your Catalog Ads by combining your product images with dynamic information from your catalog, such as product name, brand, price, and sale price, plus your own text, logos, shapes, and background colors. You design a template once, and Meta automatically applies it to every product in your catalog.
That last sentence is the whole point. If your catalog holds 5,000 products, you don’t design 5,000 ads. You design one layout, and all 5,000 products flow through it. Change the template, and every ad updates with it.
One important boundary: Templates only work on Catalog Ads, the ads generated automatically from your product catalog and data source. Your regular image and video ads are untouched by this feature. That makes it built specifically for eCommerce companies: if you sell products online and run Catalog Ads, this is for you. If you only run manually designed ads, there’s nothing here to connect a template to.
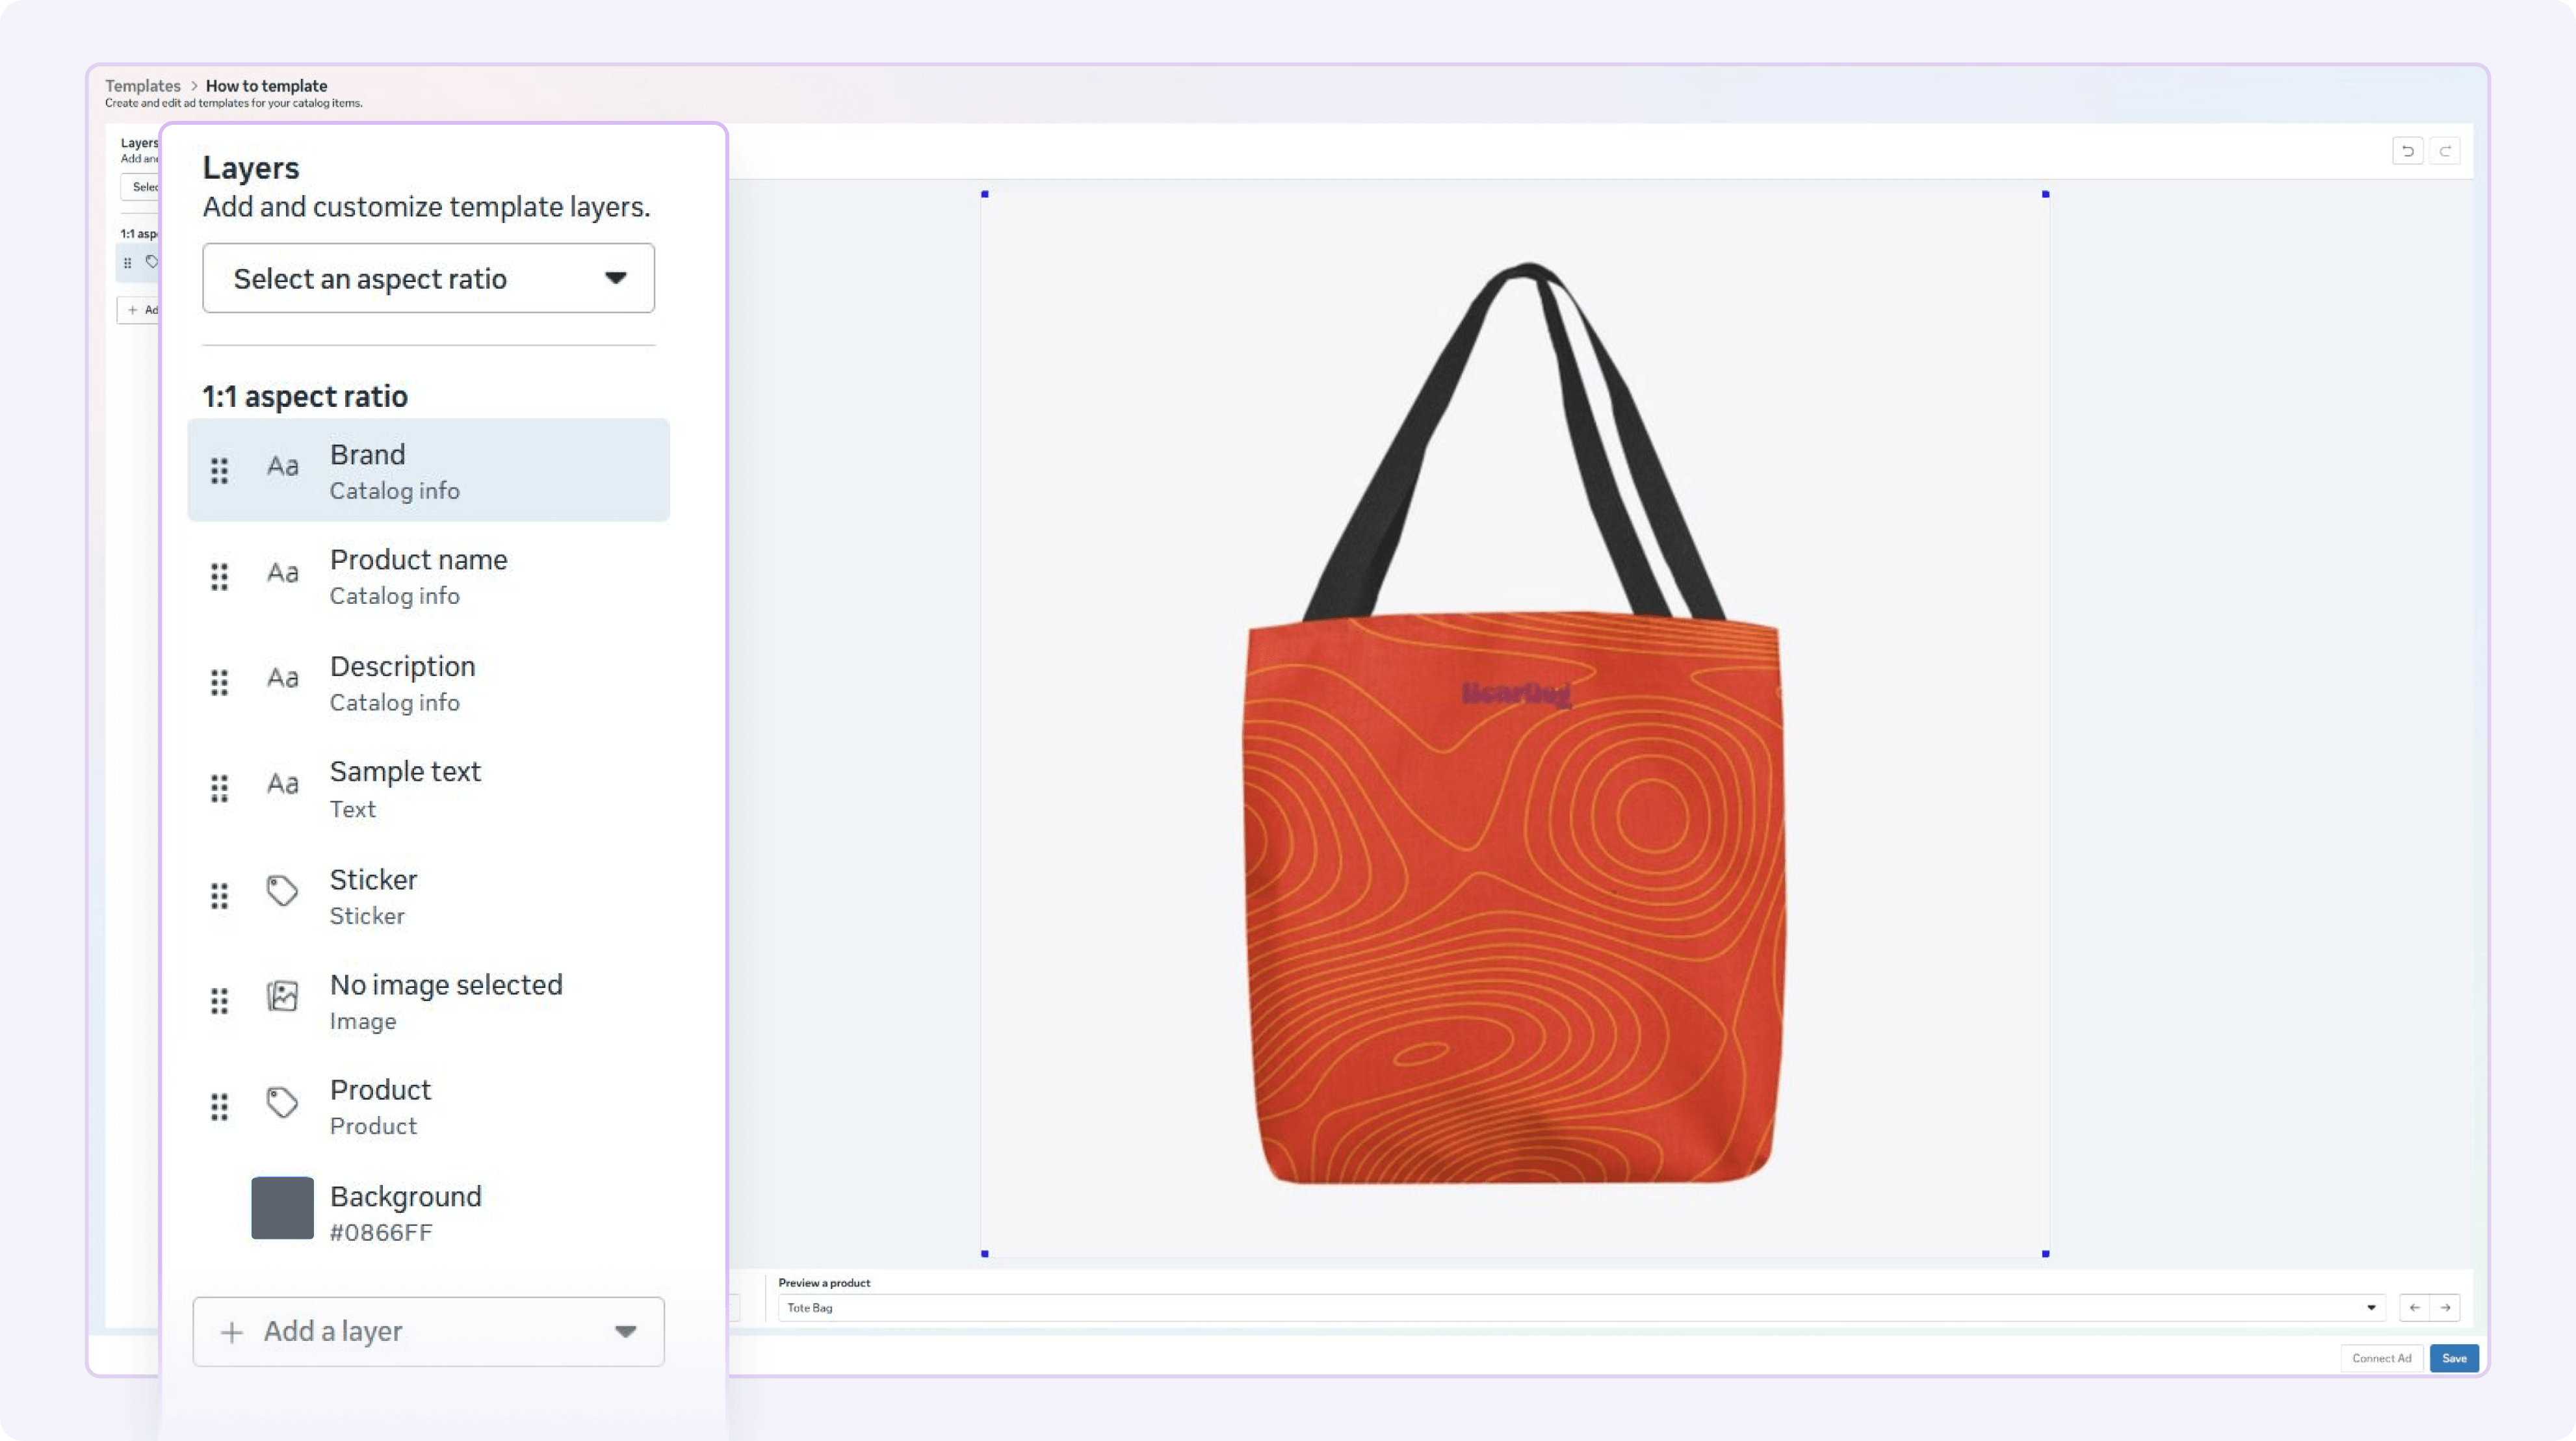
The builder works with layers, the same way a tool like Canva does. You stack a background, your product image, a price, a headline, and a logo, then move and style each one independently. No code, no design software, no exports.
Templates support 1:1, 4:5, and 9:16 aspect ratios. They work with your existing campaign setup, including Advantage+ Sales and Advantage+ Catalog campaigns. And if you’d rather not start from a blank canvas, Meta includes starter templates you can customize.
One thing Templates is not: the old frames and overlays feature. That tool let you place a single image or a price splash on top of your product photo, and that was it. Templates give you an actual design canvas. More on that history at the end of this post.
Why should you design your Catalog Ads?
Think about the last Catalog Ad you scrolled past as a consumer. A product photo on a white background. Maybe a price. Could you tell which shop it came from?
Neither can your customers. And that’s the problem with how most Catalog Ads run today: your ad looks identical to your competitor’s ad for the same kind of product. Same white background, same bare packshot, no brand, no message, no reason to pick you.
Now hold that against what we know about ad performance. Nielsen analyzed close to 500 campaigns and found that creative accounts for 47% of an ad’s sales impact. More than reach, more than targeting, more than the brand itself. The creative is the single biggest lever you have.
And Catalog Ads are where that lever matters most. In Confect’s Andromeda study of 115.7 billion ad impressions, top-performing advertisers generated 60% of their total ad revenue from Catalog Ads. So the format quietly carrying most of the revenue is the same format where most advertisers invest exactly zero in creative.
That mismatch is the opportunity. When we here at Confect A/B tested designed Catalog Ads against bare product images across 268 eCommerce companies, design alone lifted Return on Ad Spend by a median of 31%. Not a new audience. Not a new bid strategy. Just design.
And if you want one more signal that this is where the industry is heading: Meta just built a design tool for it. Platforms don’t build features for problems nobody has.
How to create a Catalog Ad template in Meta Ads Manager (step by step)
The builder is simple once you know where everything sits. Here’s the full walkthrough, from finding the feature to connecting your finished template to a live ad.
Step 1: Find the template builder in Ads Manager
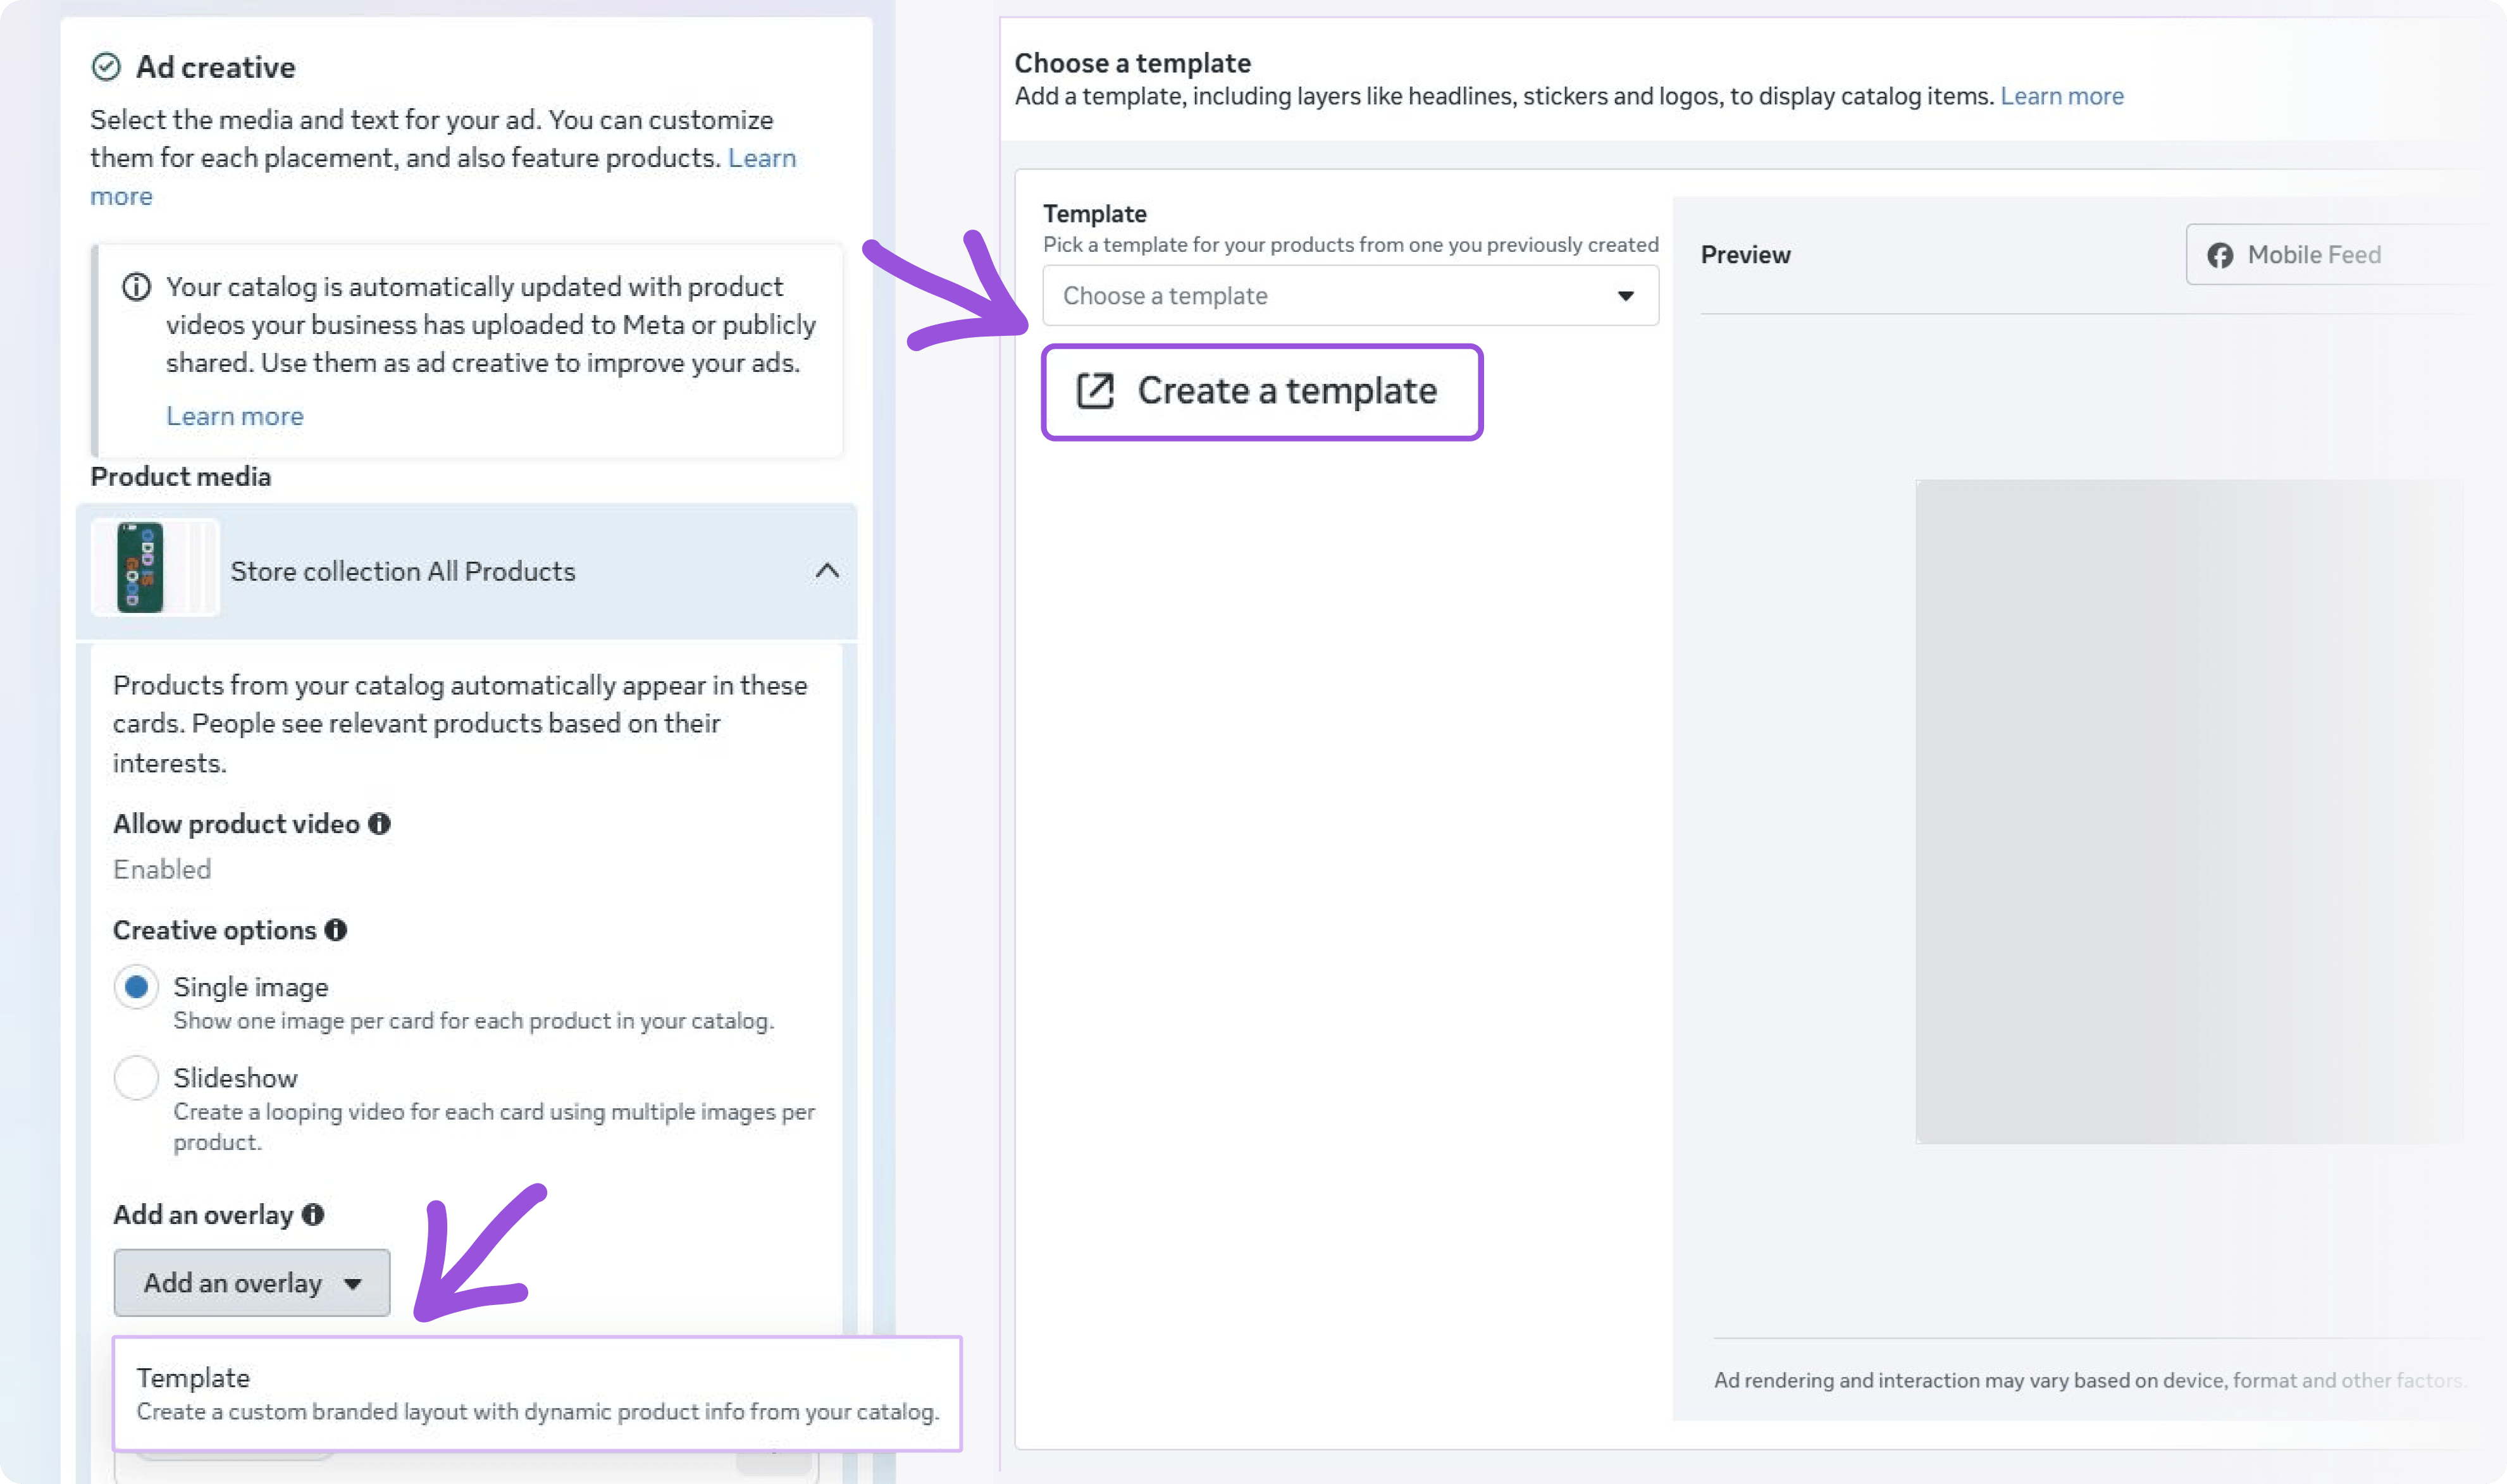
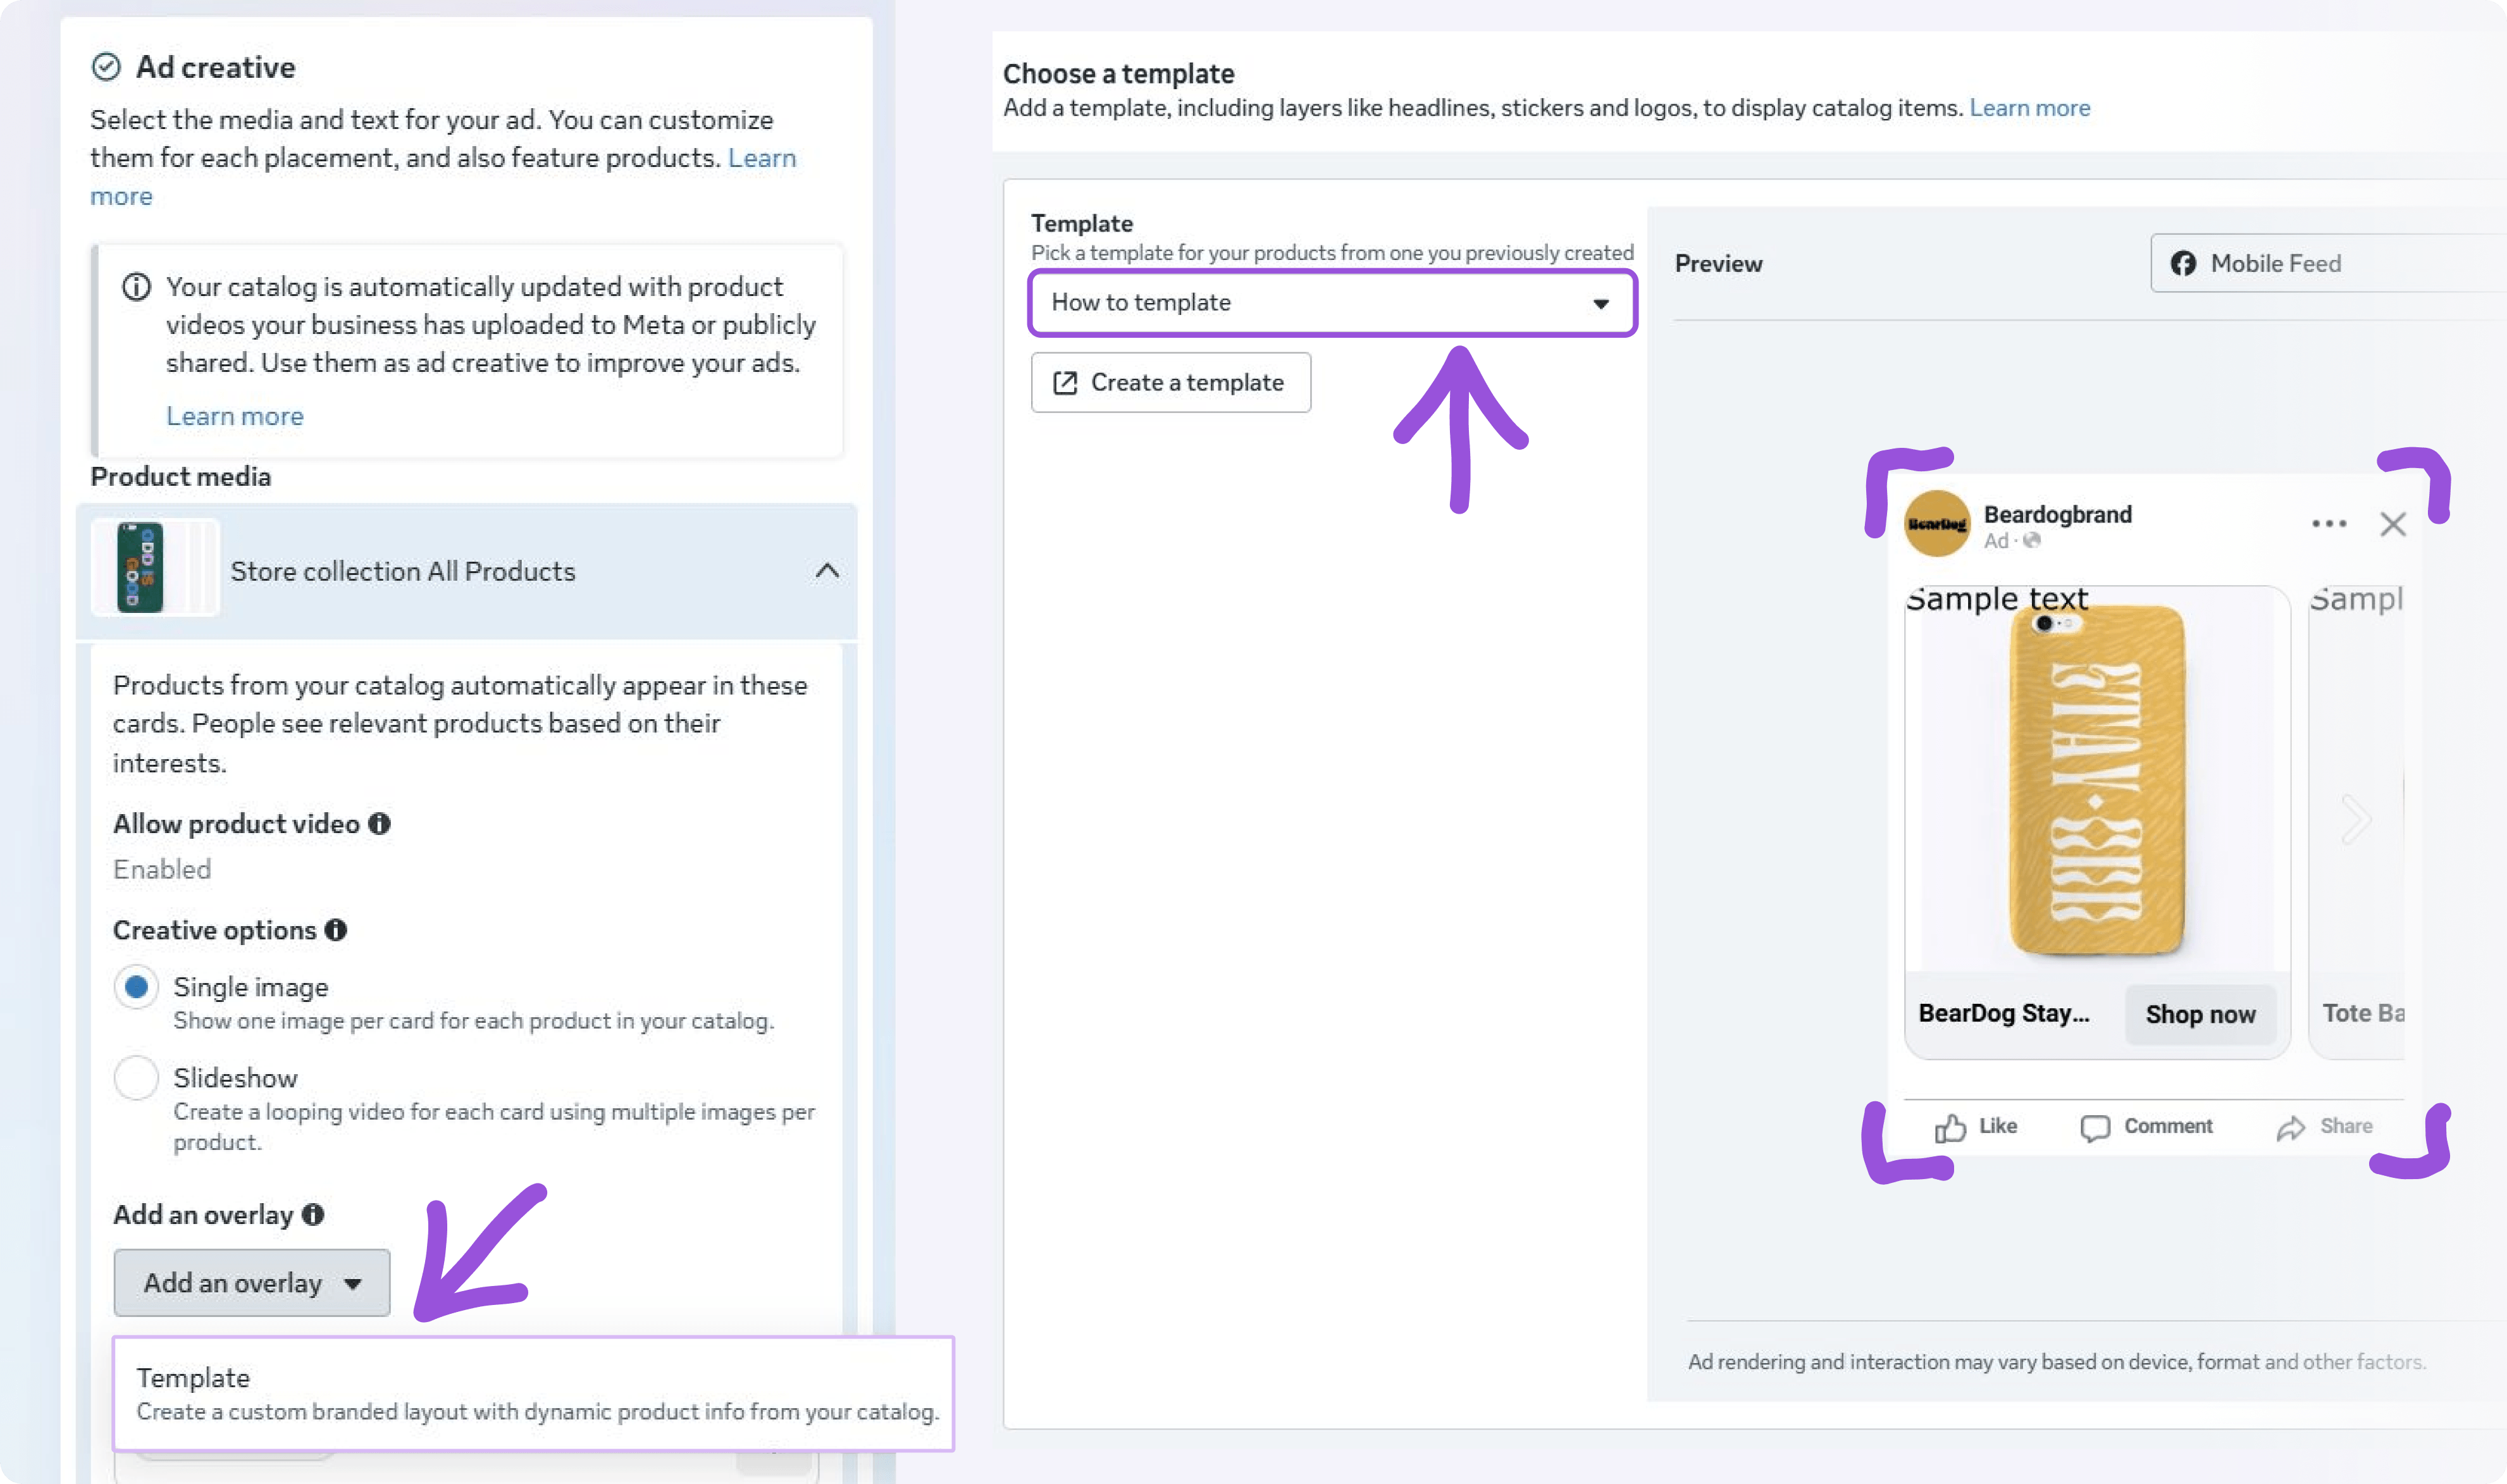
Templates live at the ad level. Create a catalog campaign as you normally would, and when you reach the ad level, scroll down to the Ad creative section.
Under Add an overlay, open the dropdown and select Template.
From here you have two options: pick a template you’ve already built, or click Create a template to start a new one. Clicking Create a template opens the template builder. Technically, the builder lives in Commerce Manager, so don’t be surprised when Meta sends you there. You land directly in the editor.
The alternative path: Templates in Commerce Manager
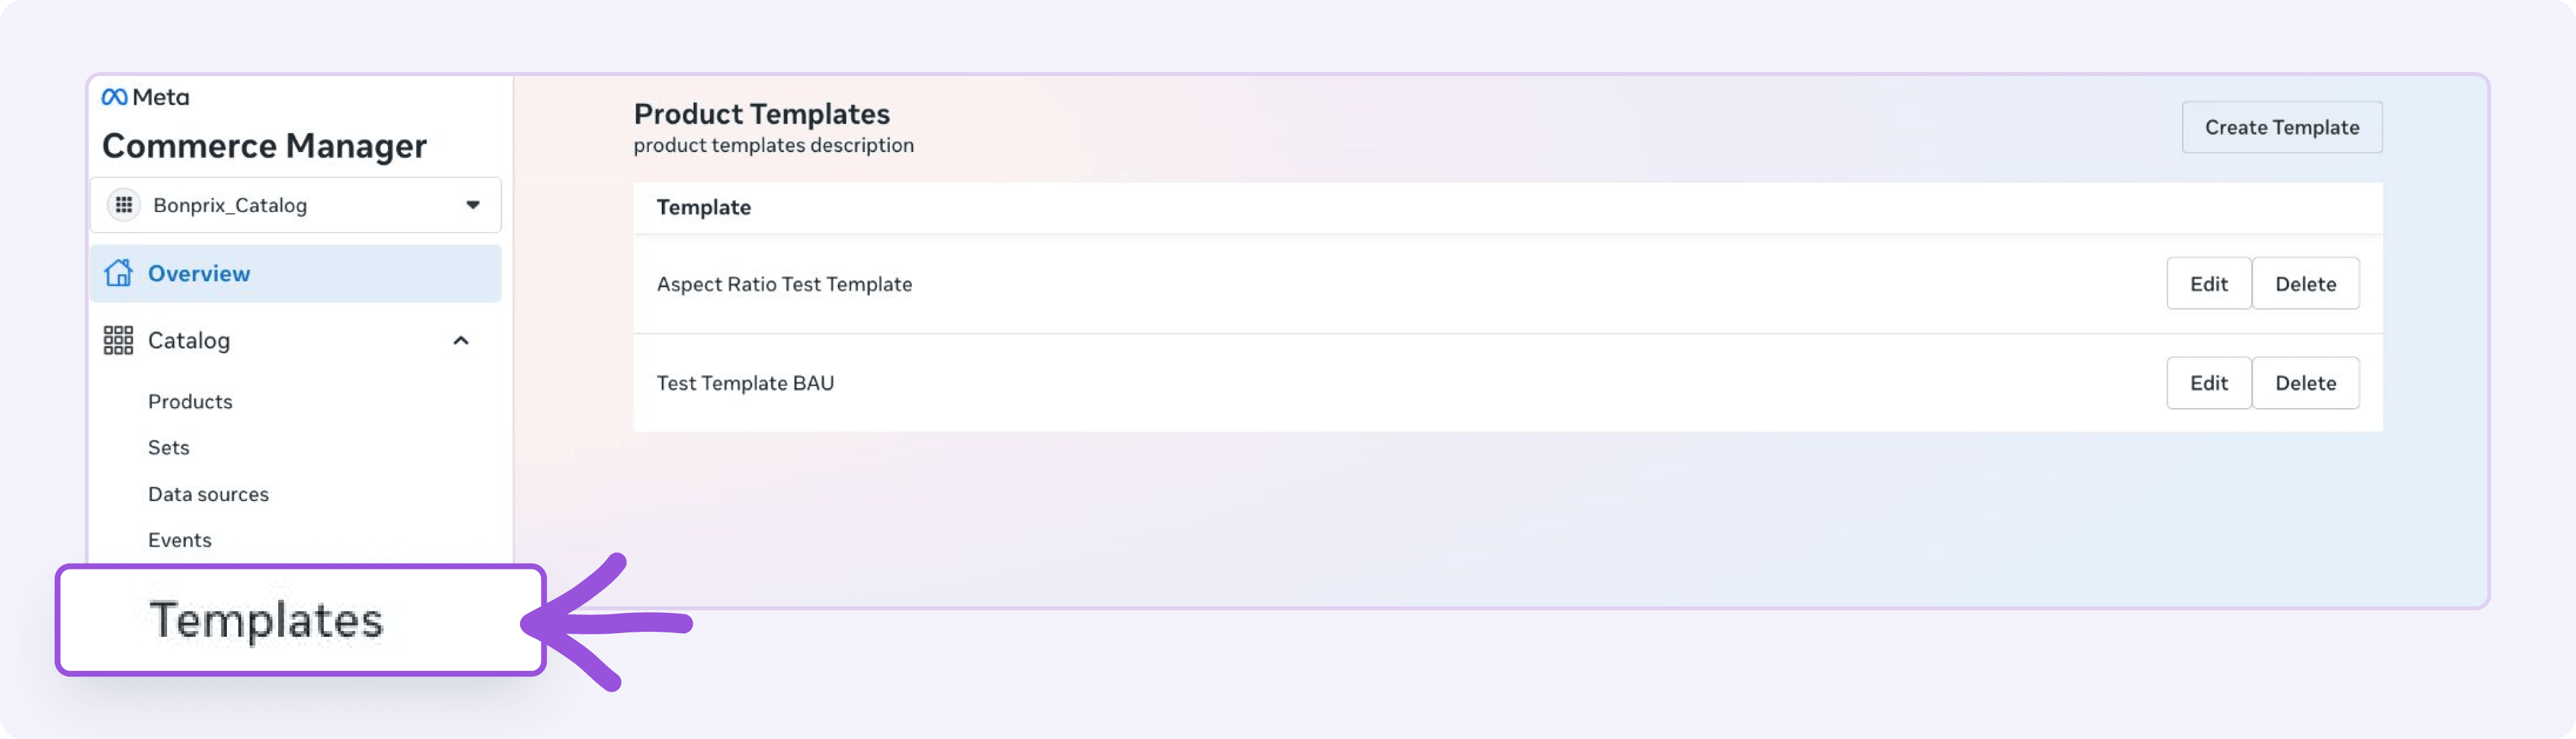
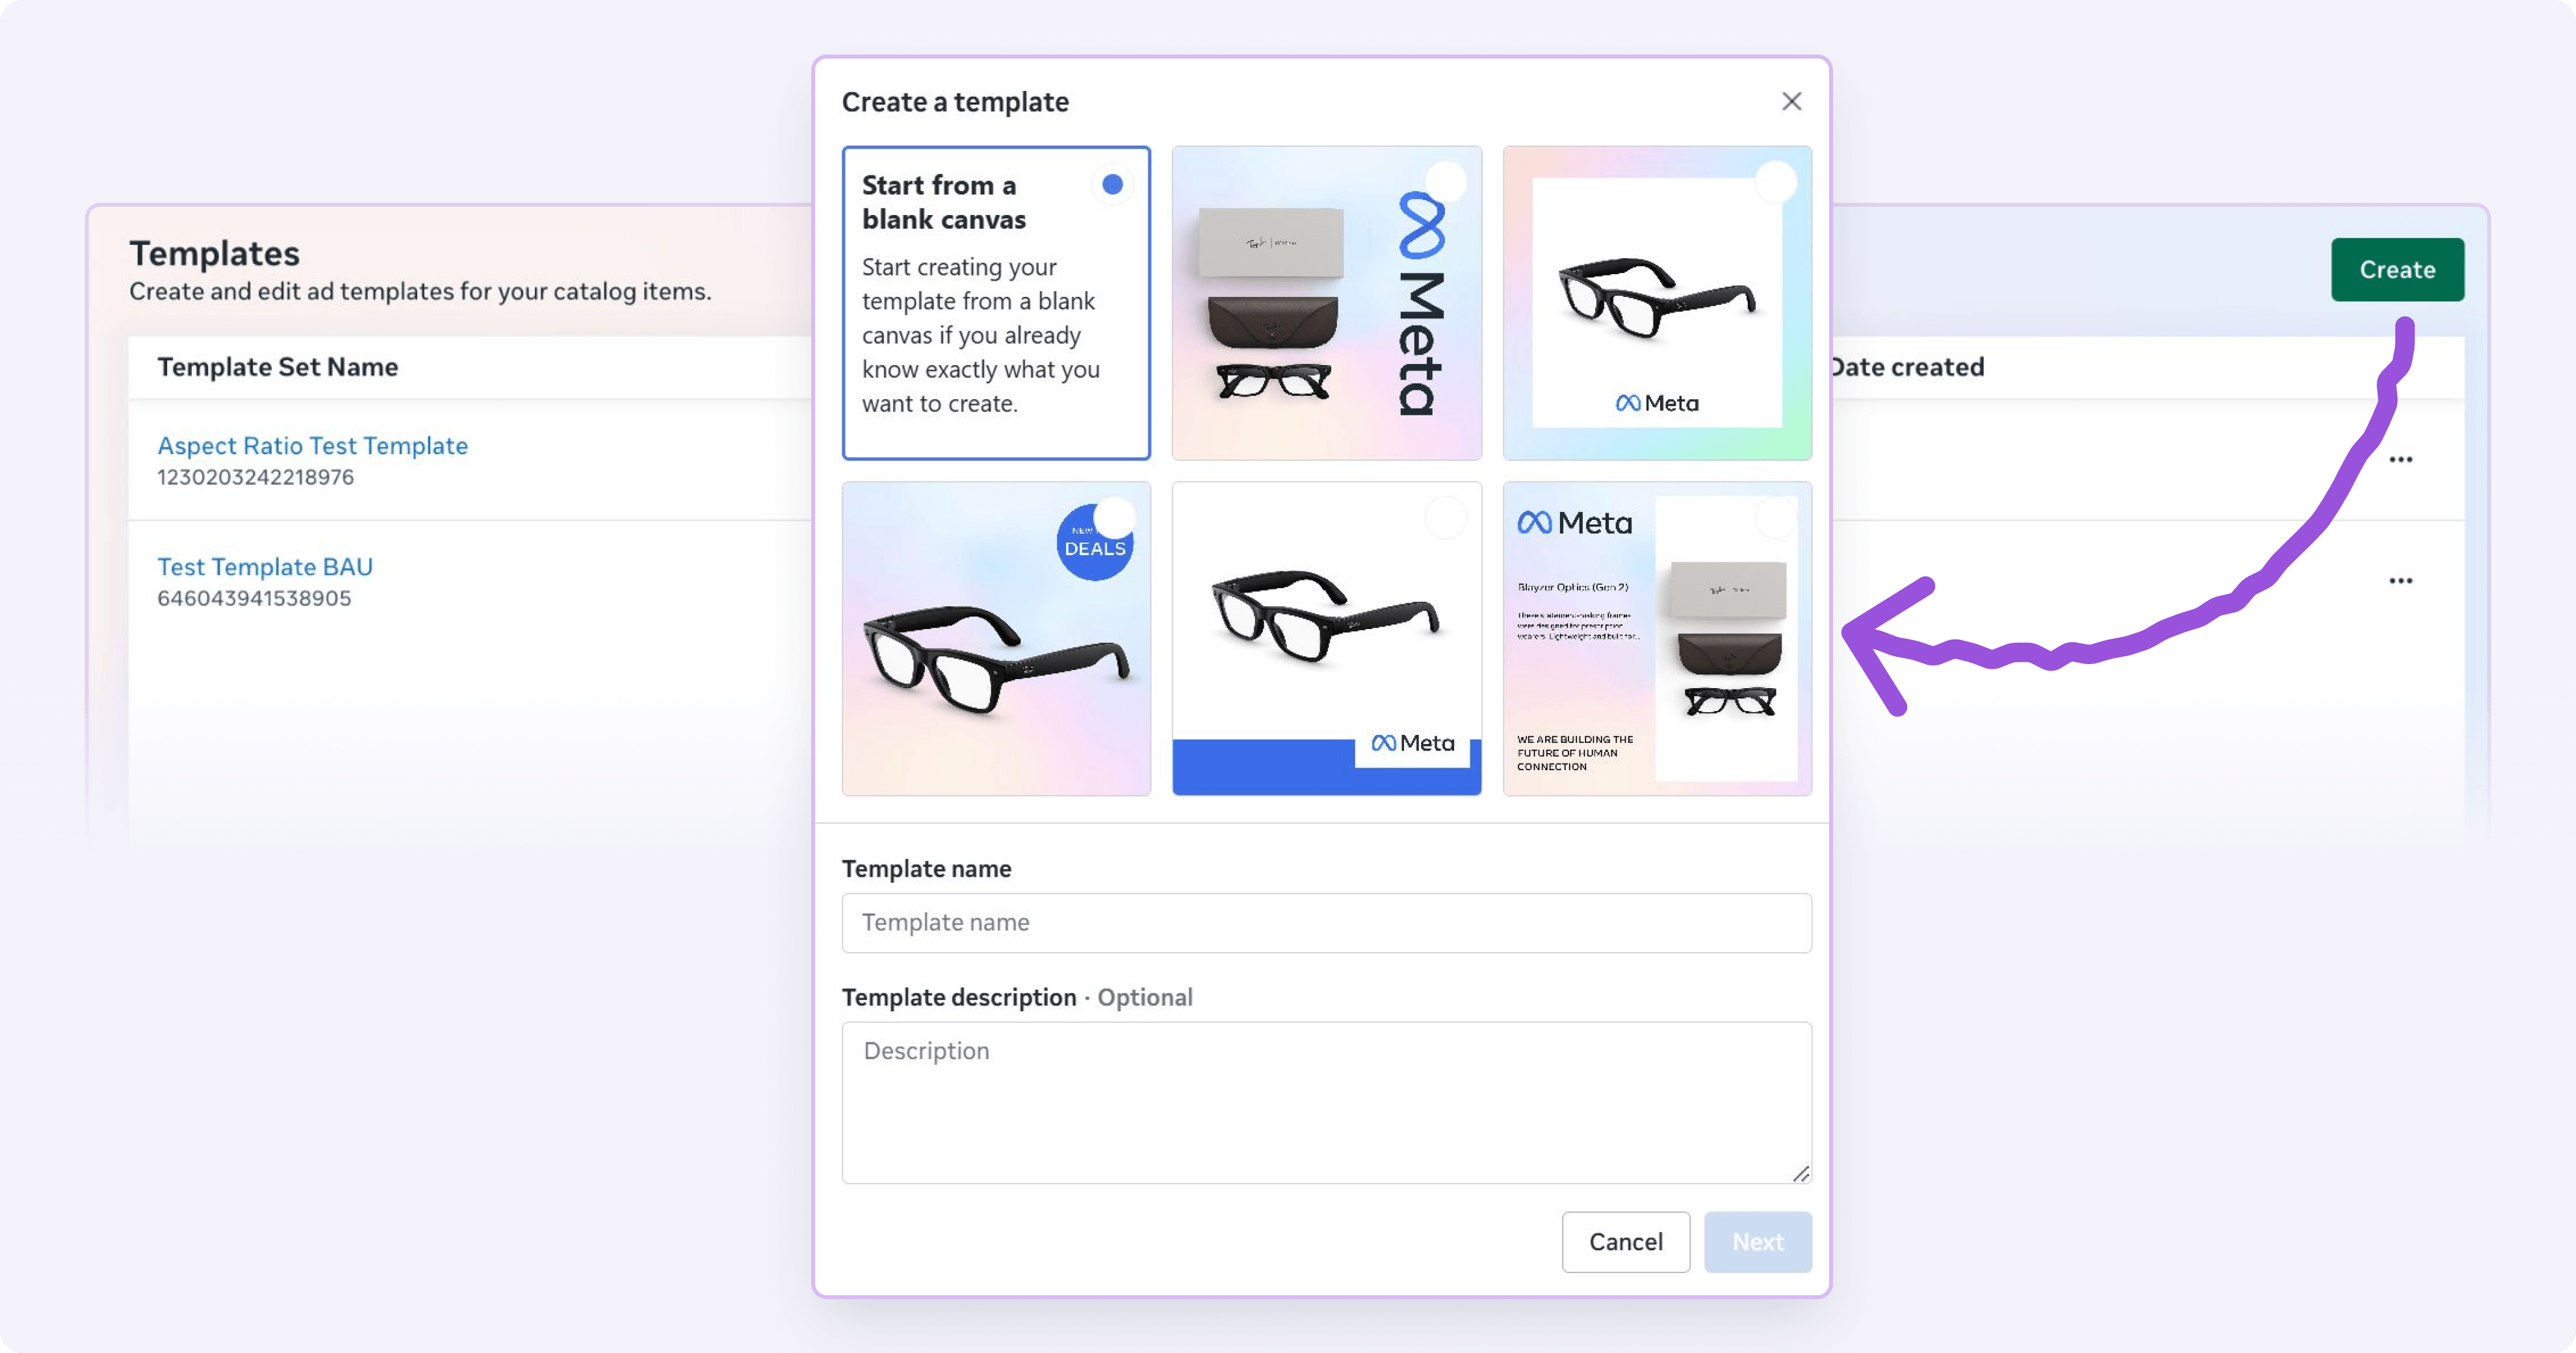
You can also start from Commerce Manager. Select your catalog, click Templates in the left-side menu, and you’ll see your template overview. The Create button in the top right corner starts a new template.
Same builder, different door. The Commerce Manager path is handy when you want to prepare templates before a campaign launches, or manage your growing template library in one place.
Step 2: Create a new template
When you click Create, a pop-up gives you a choice: start from a blank canvas or pick one of Meta’s starter templates. The starter templates are very generic, so treat them as inspiration for how a layout can be structured, nothing more. No serious brand should run them as finished designs. If you know what you want, blank canvas is faster.
Name your template and add a description. Meta recommends the description, and so do we, but for a different reason: once you have ten templates, names like “Template 3” will haunt you. Use a system: what it’s for, plus the aspect ratio. “Evergreen - white - 1:1” beats “New template (copy)” every time.
Click Next, and your template opens.
Step 3: Get to know the template editor
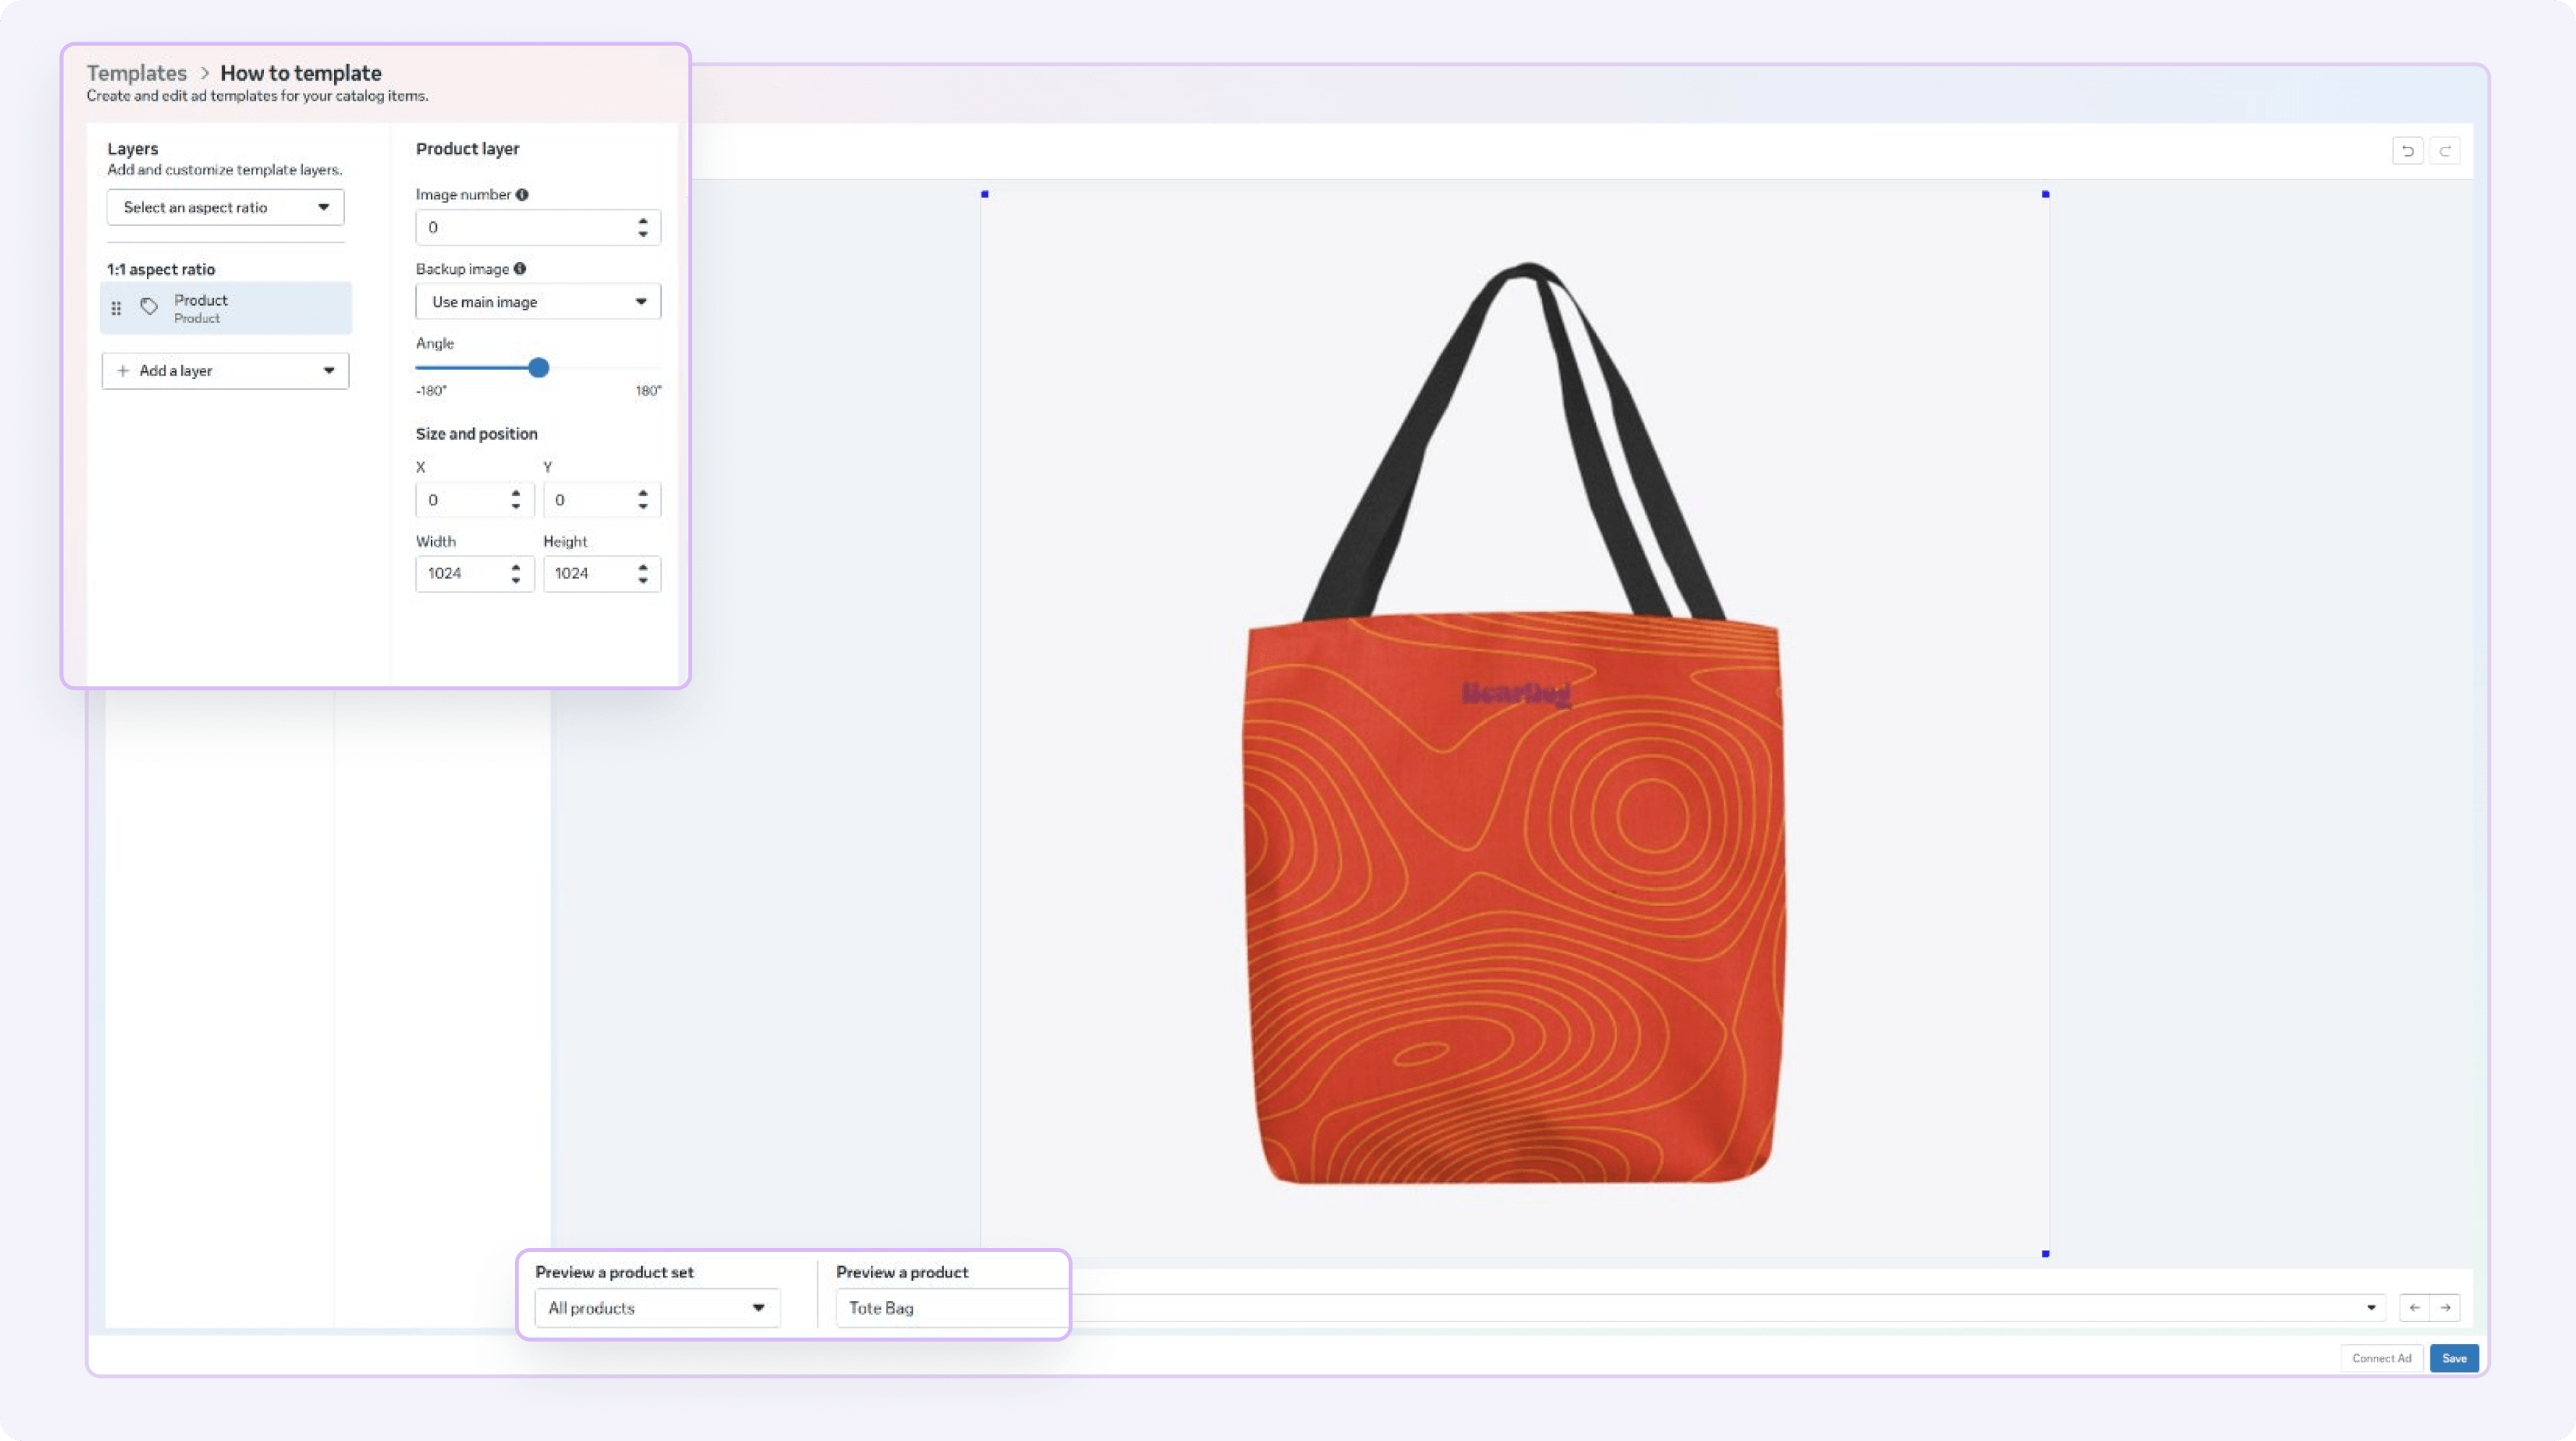
The editor is built around four areas: your layers list on the left, settings for the selected layer next to it, the canvas in the middle, and product preview controls at the bottom.
A Product Layer is already applied when you open a new template, showing a default product from your catalog.
The preview controls matter more than they look. Use Preview a product set and Preview a product to flip through your actual catalog while you design. Your template needs to work for every product, not just the photogenic one. Check products with long names, tall images, and low-contrast photos before you call the design done. When we built our first templates, designing around one perfect product was the first mistake we had to unlearn.
Two more things: undo and redo sit at the top right, and the Save button sits at the bottom right. Save as you go. The editor does not save for you.
Step 4: Build your design with layers
Everything you add to a template is a layer. Click Add a layer and you get six types: Product, Catalog Field, Text, Image, Sticker, and Background. Together they cover everything a Catalog Ad design needs.
Here’s what each one does, and when to reach for it.
Product Layer: your product image
The Product Layer pulls the product image from your catalog. One is added automatically when you create a template.
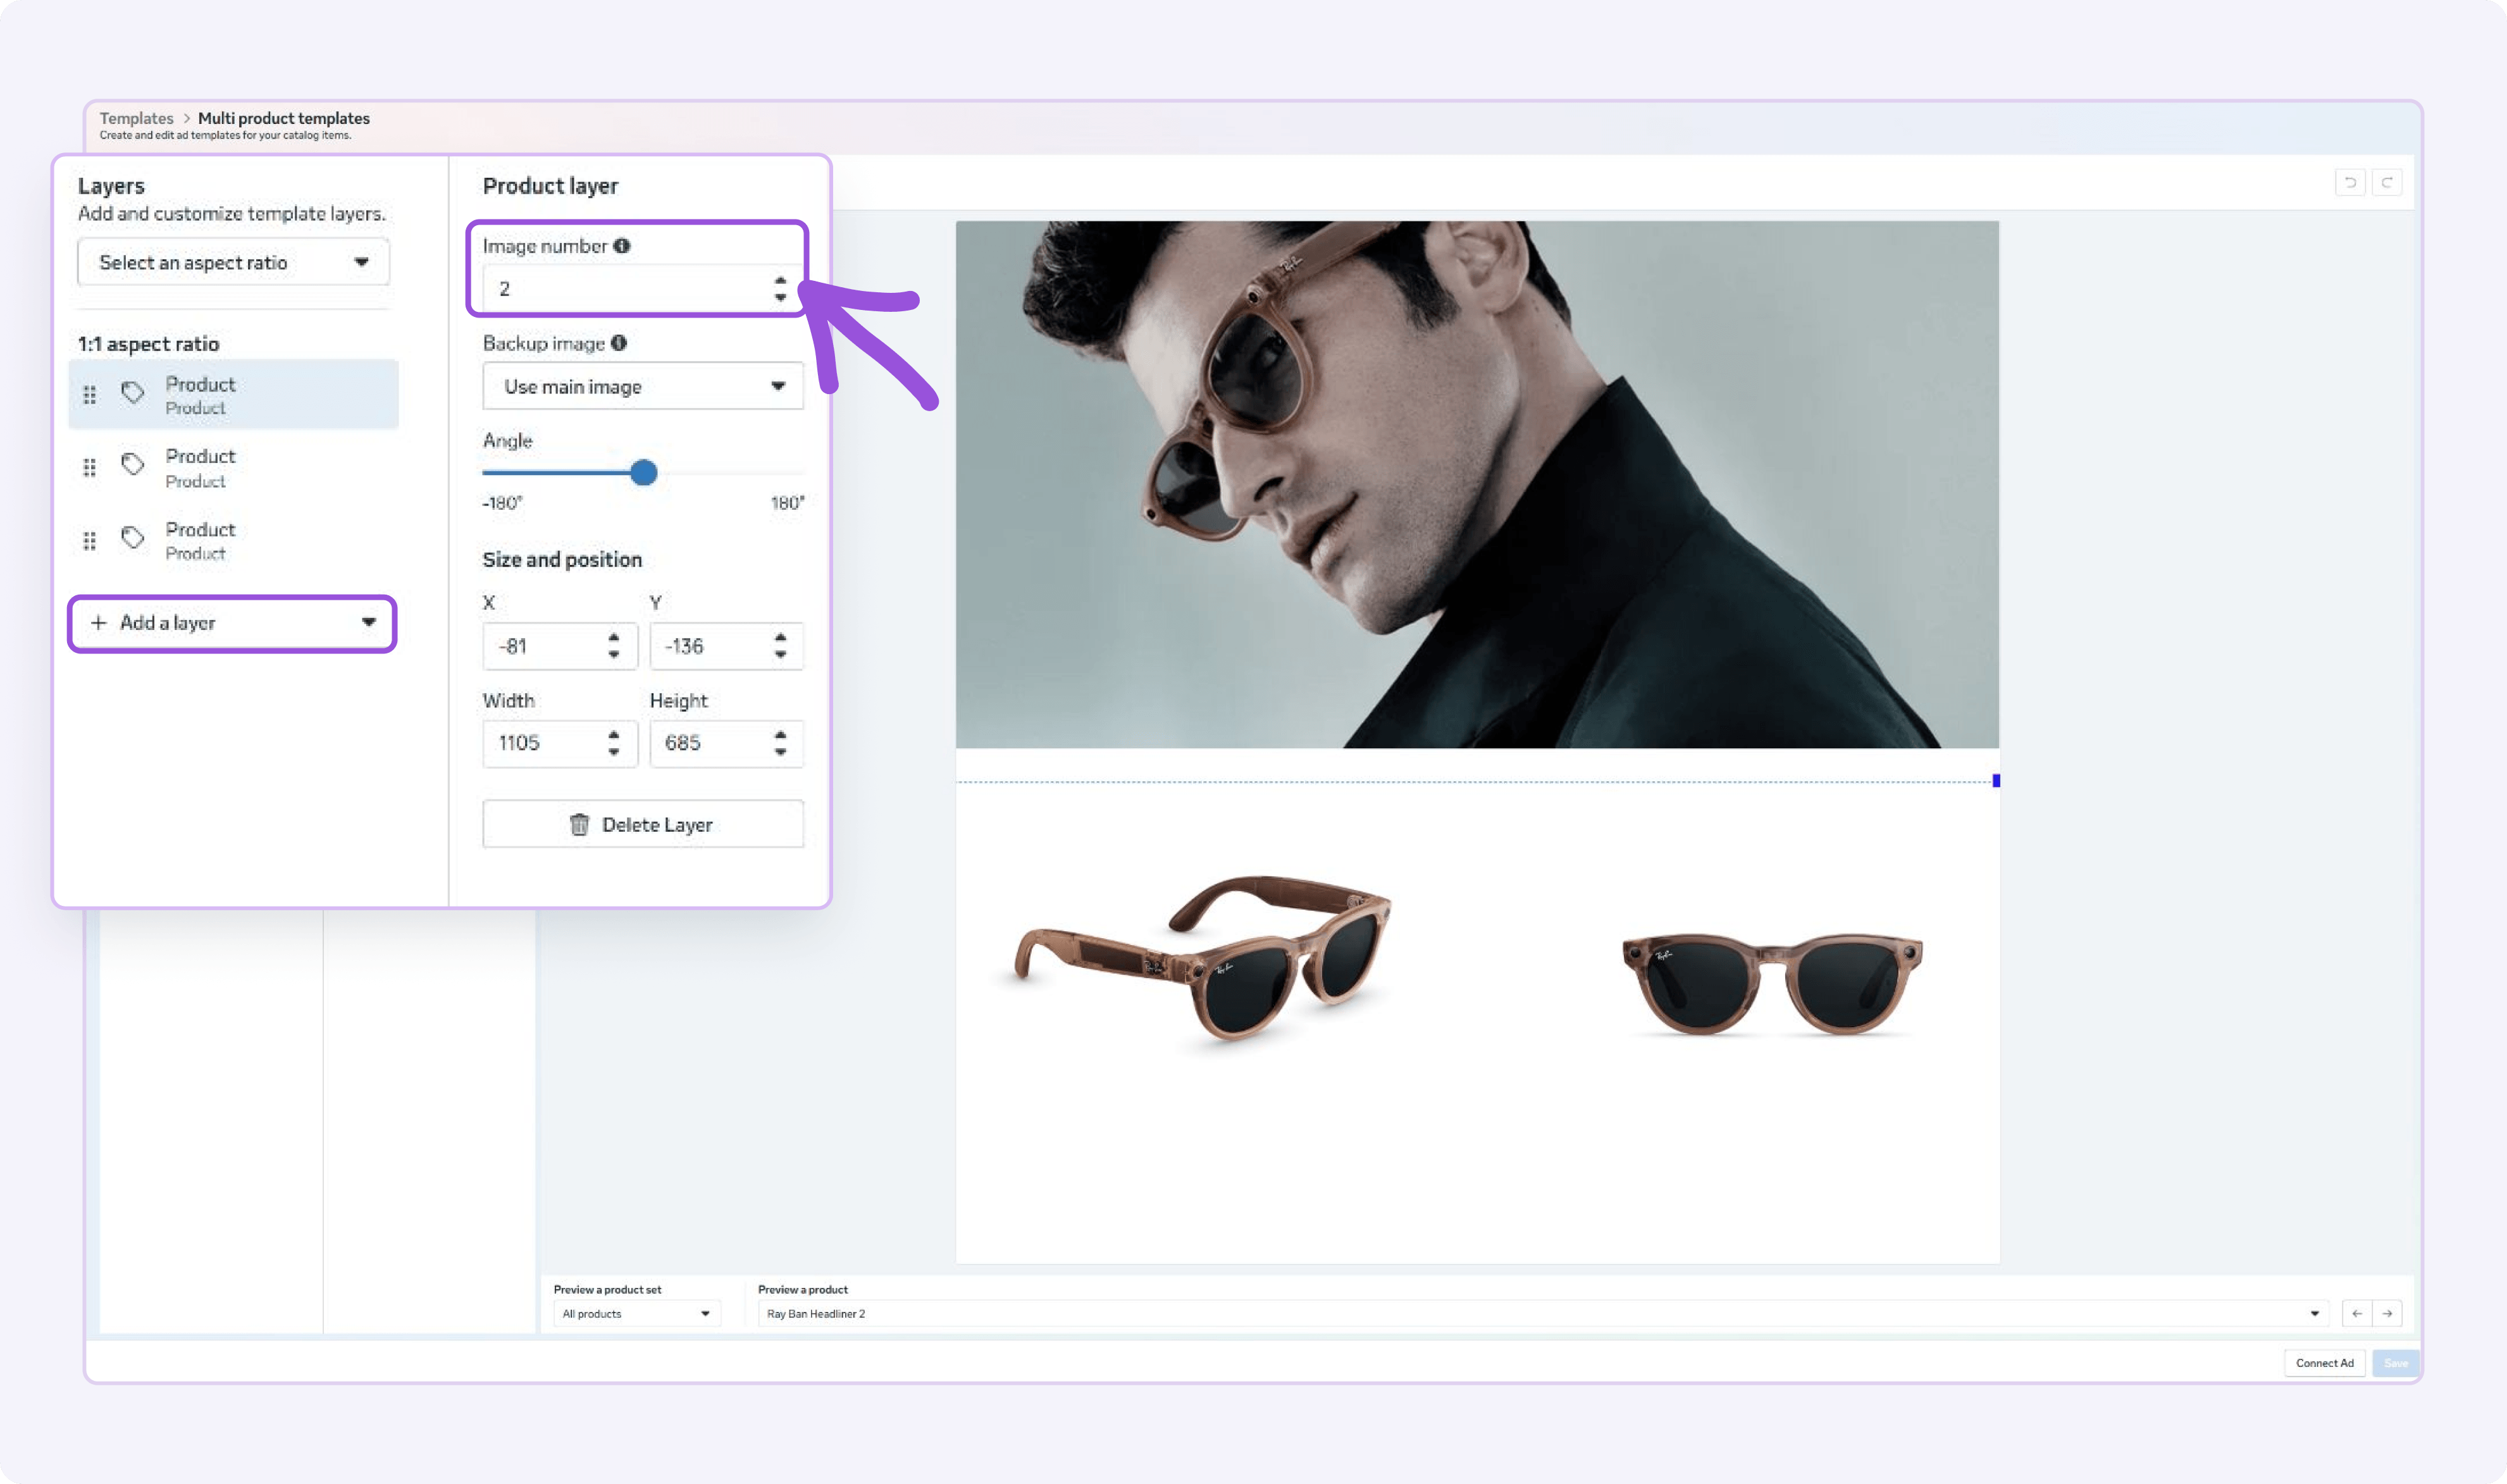
Image number decides which image from your catalog to show, and the numbering maps directly to your data source: 0 is the primary image (image_link), 1 is the first additional image (additional_image_link), 2 is the second additional image, and so on.
You can also set a backup image, which tells Meta what to show if the chosen image doesn’t exist for a product: the main image, or nothing. Why that matters, and its one awkward side effect, we’ll cover in the multi-image section further down.
Resize by dragging the corner handles or typing exact width and height values. Drag the image to reposition it, or tilt it with the angle slider.
One piece of advice: let the product dominate. It should be the largest element on the canvas, because it’s the reason anyone stops scrolling in the first place.
Catalog Field Layer: dynamic prices, names, and product info
This is the layer that makes a template dynamic, and honestly, it’s where the fun starts.
A Catalog Field Layer pulls live information from your catalog and renders it as text in your design. You can add:
- Product Name
- Brand Name
- Description
- Price
- Current Price (the catalog’s version of the sale price)
- Custom Label 0-4
Current Price is worth pairing with Price. Place them next to each other, and every discounted product shows its original price beside the new one. That’s anchoring at work: the original price makes the sale price feel like the deal it is.
The Custom Labels deserve special attention. They carry whatever you put into them through your data source: savings amounts, review scores, delivery promises, category names. This is how you get information into your design that Meta doesn’t offer as a standard field. We’ve written a full guide on using product attributes in Catalog Ads if you want to go deeper.
Because the values come from your catalog, every product fills the template with its own information: 4.8 stars on one product, 4.6 on the next. One design, thousands of variations.
One limitation to know: each Catalog Field Layer shows one field, and one field only. The same spot can’t show a star rating on some products and a savings amount on others. If you want that kind of flexibility, you build the logic into the custom label itself in your data source management tool, and the template simply displays whatever the field holds.
Text Layer: headlines and messaging
A Text Layer is static: whatever you write shows on every product. Use it for messages that don’t change per product. Free shipping thresholds, campaign lines, your tagline.
You control font, size, color, opacity, alignment, bold and italic styling, and rotation. Meta currently offers 26 fonts, including familiar names like Lato, Montserrat, Open Sans, Poppins, and Roboto.
If none of them match your brand, bigger advertisers can get their own brand fonts enabled by asking their Meta rep. For everyone else, pick the closest match and use it consistently. Consistency is what makes the ads read as yours.
Set your expectations here, though. Between the font limitations and the basic text controls, getting text to look like the polished typography in your Photoshop or Canva ads is genuinely difficult. You’ll get close-ish. Not identical.
Image Layer: logos and graphics
The Image Layer lets you upload your own jpg or png and place it anywhere in the design.
The obvious use is your logo. A logo turns an anonymous product photo into your ad, and it’s the simplest branding move available in the builder. Upload a png with a transparent background so it sits cleanly on any design.
Beyond logos, use Image Layers for graphic elements you’ve designed elsewhere: payment icons, campaign graphics, trust badges. Resize and position them the same way as every other layer.
Sticker Layer: badges and discount splashes
Stickers are simple shapes, square, circle, or rectangle, with optional text inside. You control the shape color, plus the text, font, size, and color inside it.
This is your badge maker. A circle that says “Sale”. A rectangle that says “New”. The classic discount splash.
Here’s a trick worth stealing: use a sticker as a container, then place a Catalog Field Layer on top of it. Now you have a colored price tag that updates per product. The sticker draws the eye, the field does the work.
One badge is a focal point. Five badges are noise. Design theory calls this the isolation effect: an element gets attention precisely because it stands apart. Keep it standing apart.
Background Layer: the color behind your products
The Background Layer sets a color behind everything else. It always sits at the bottom of the layer stack, no matter what.
This one layer does more branding work than you’d expect. A brand color behind every product makes your Catalog Ads recognizable before anyone reads a word. And contrast is your friend: light products need darker backgrounds, dark products need lighter ones. If the product melts into the background, the design has failed at its only job.
Want an image as your backdrop instead of a flat color? Add an Image Layer, stretch it across the canvas, and keep it just above the Background Layer in the stack.
Step 5: Get your layer order right
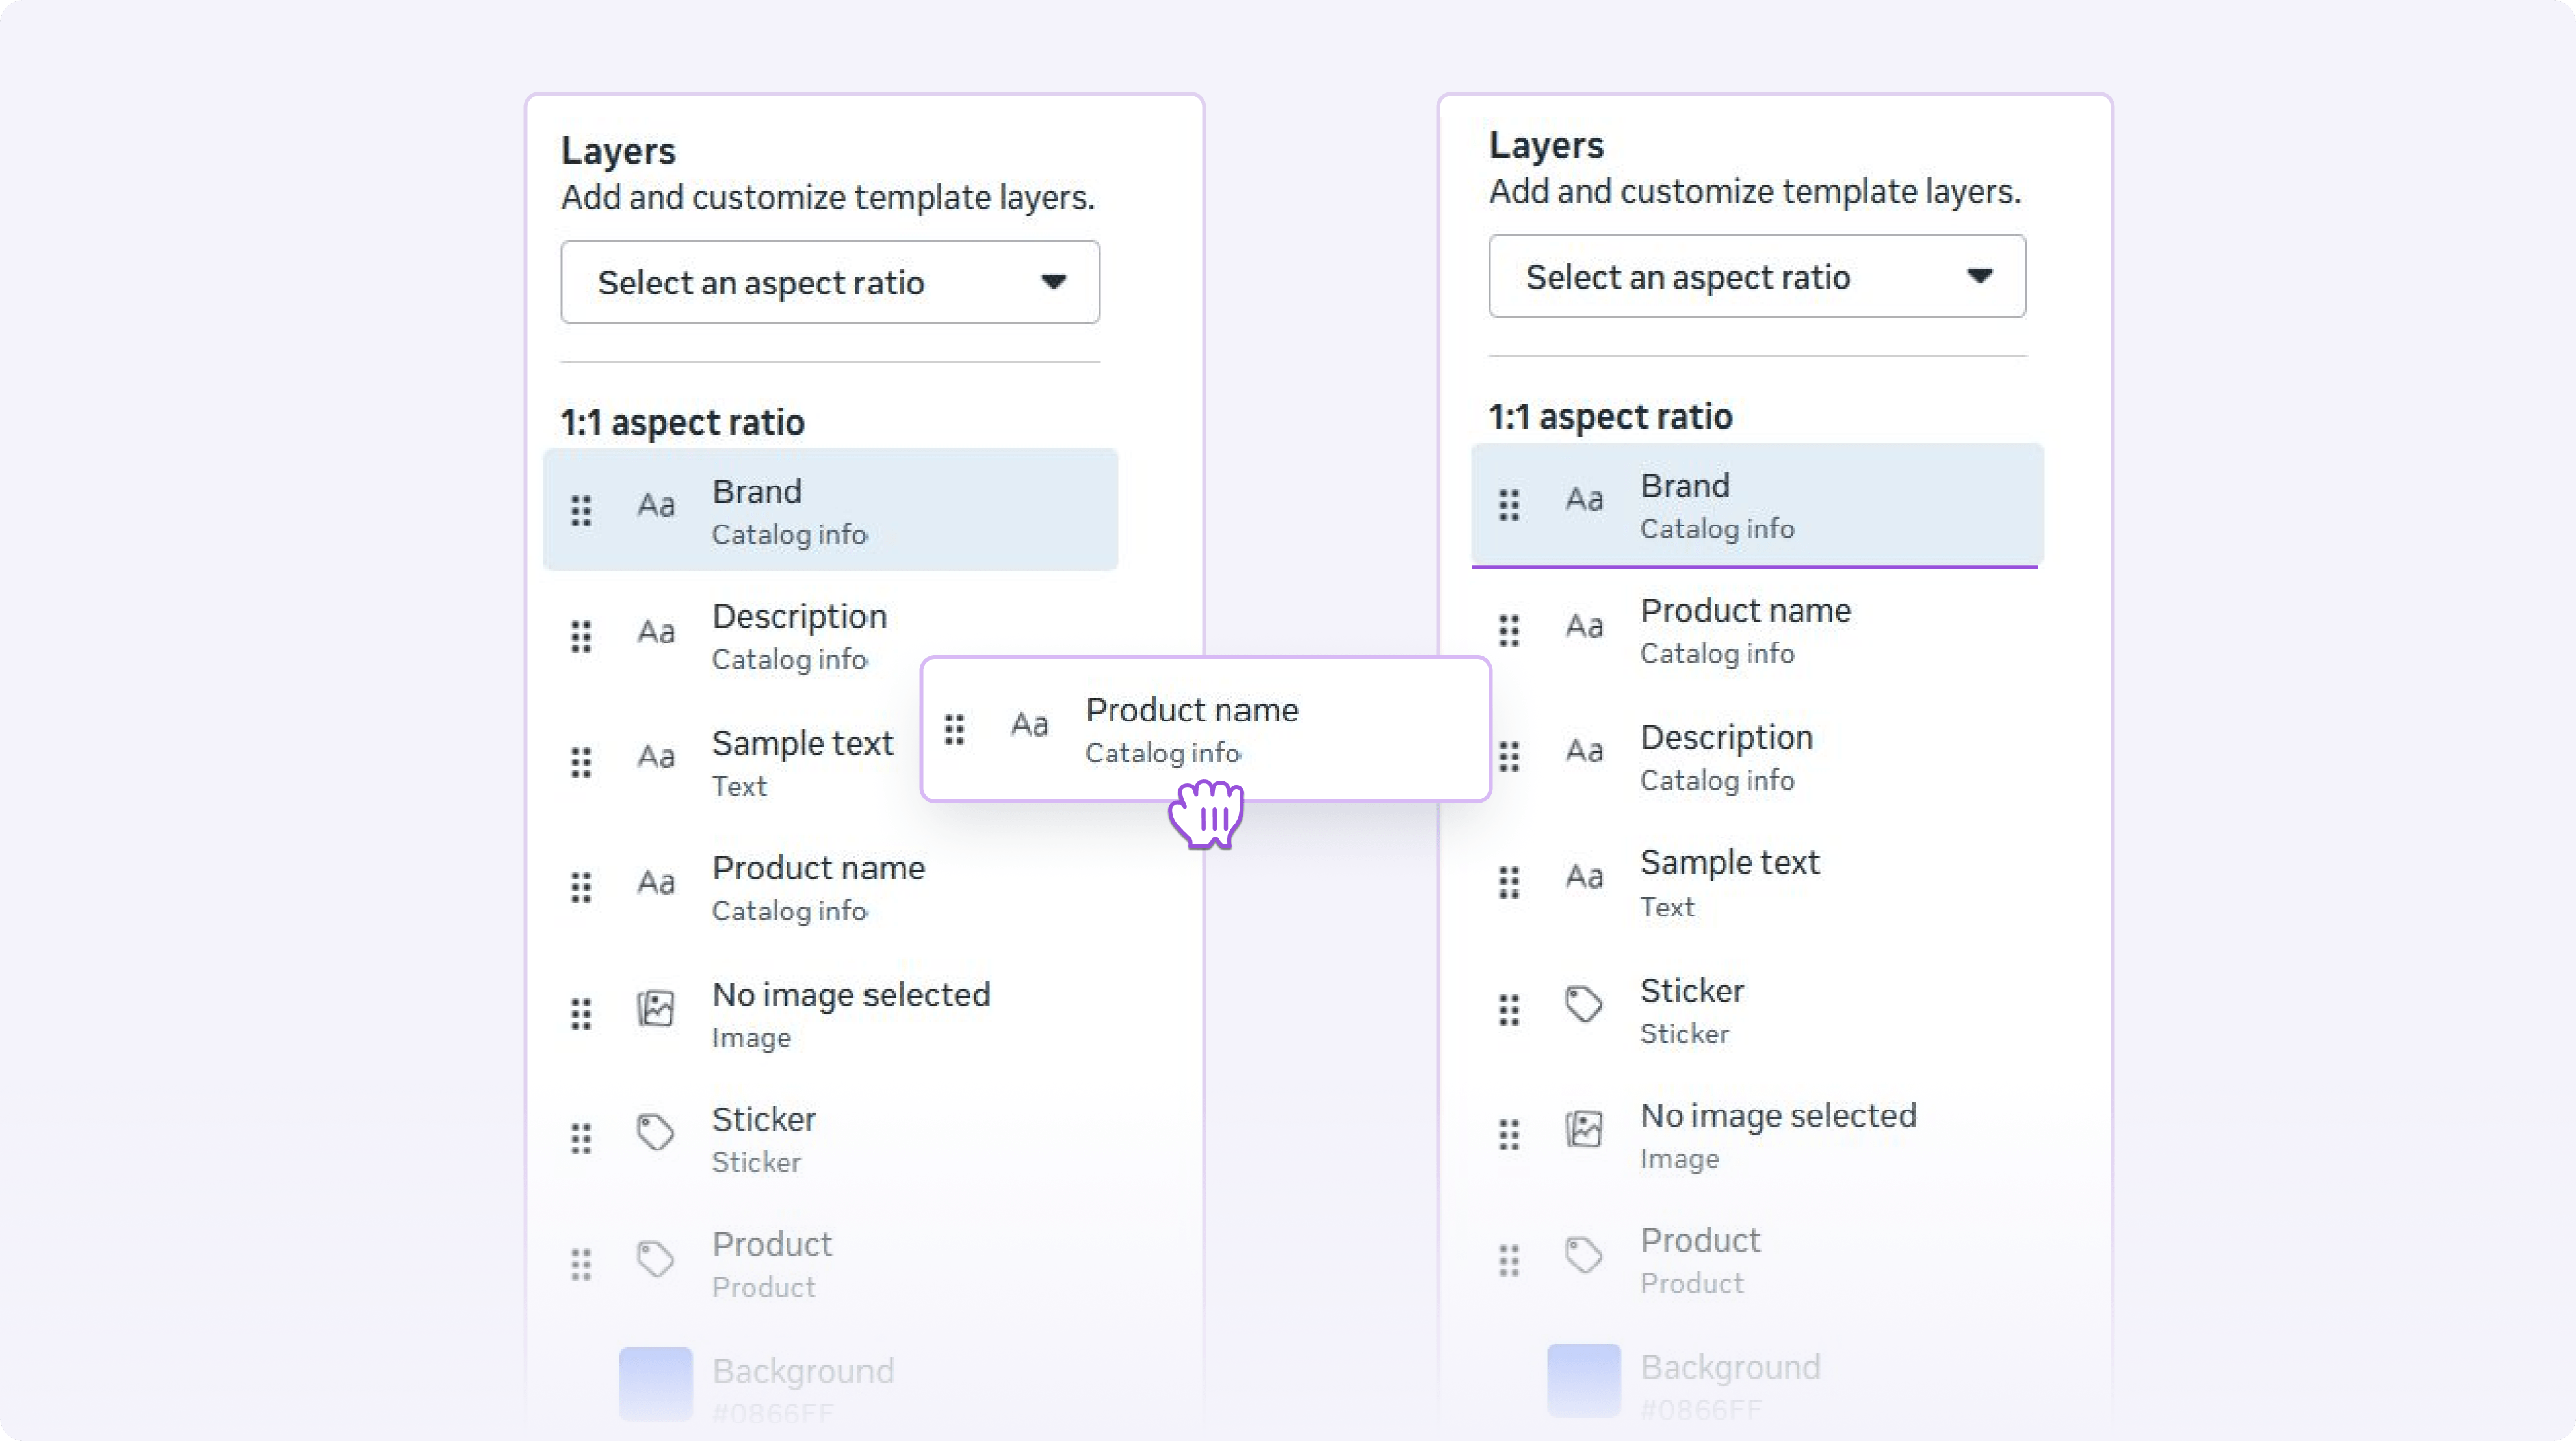
Layers stack. The top layer in your list sits in front of everything below it, and the Background Layer is locked to the bottom.
Reorder by grabbing the drag handle next to a layer and pulling it up or down the list.
A reliable order from top to bottom: badges and prices first, then headlines, then your logo, then the product, then the background. The logic is simple: information sits in front, the product fills the middle, the backdrop stays behind. Elements in front of the product can overlap its background, but they should never cover the product itself.
Step 6: Add 4:5 and 9:16 versions of your template
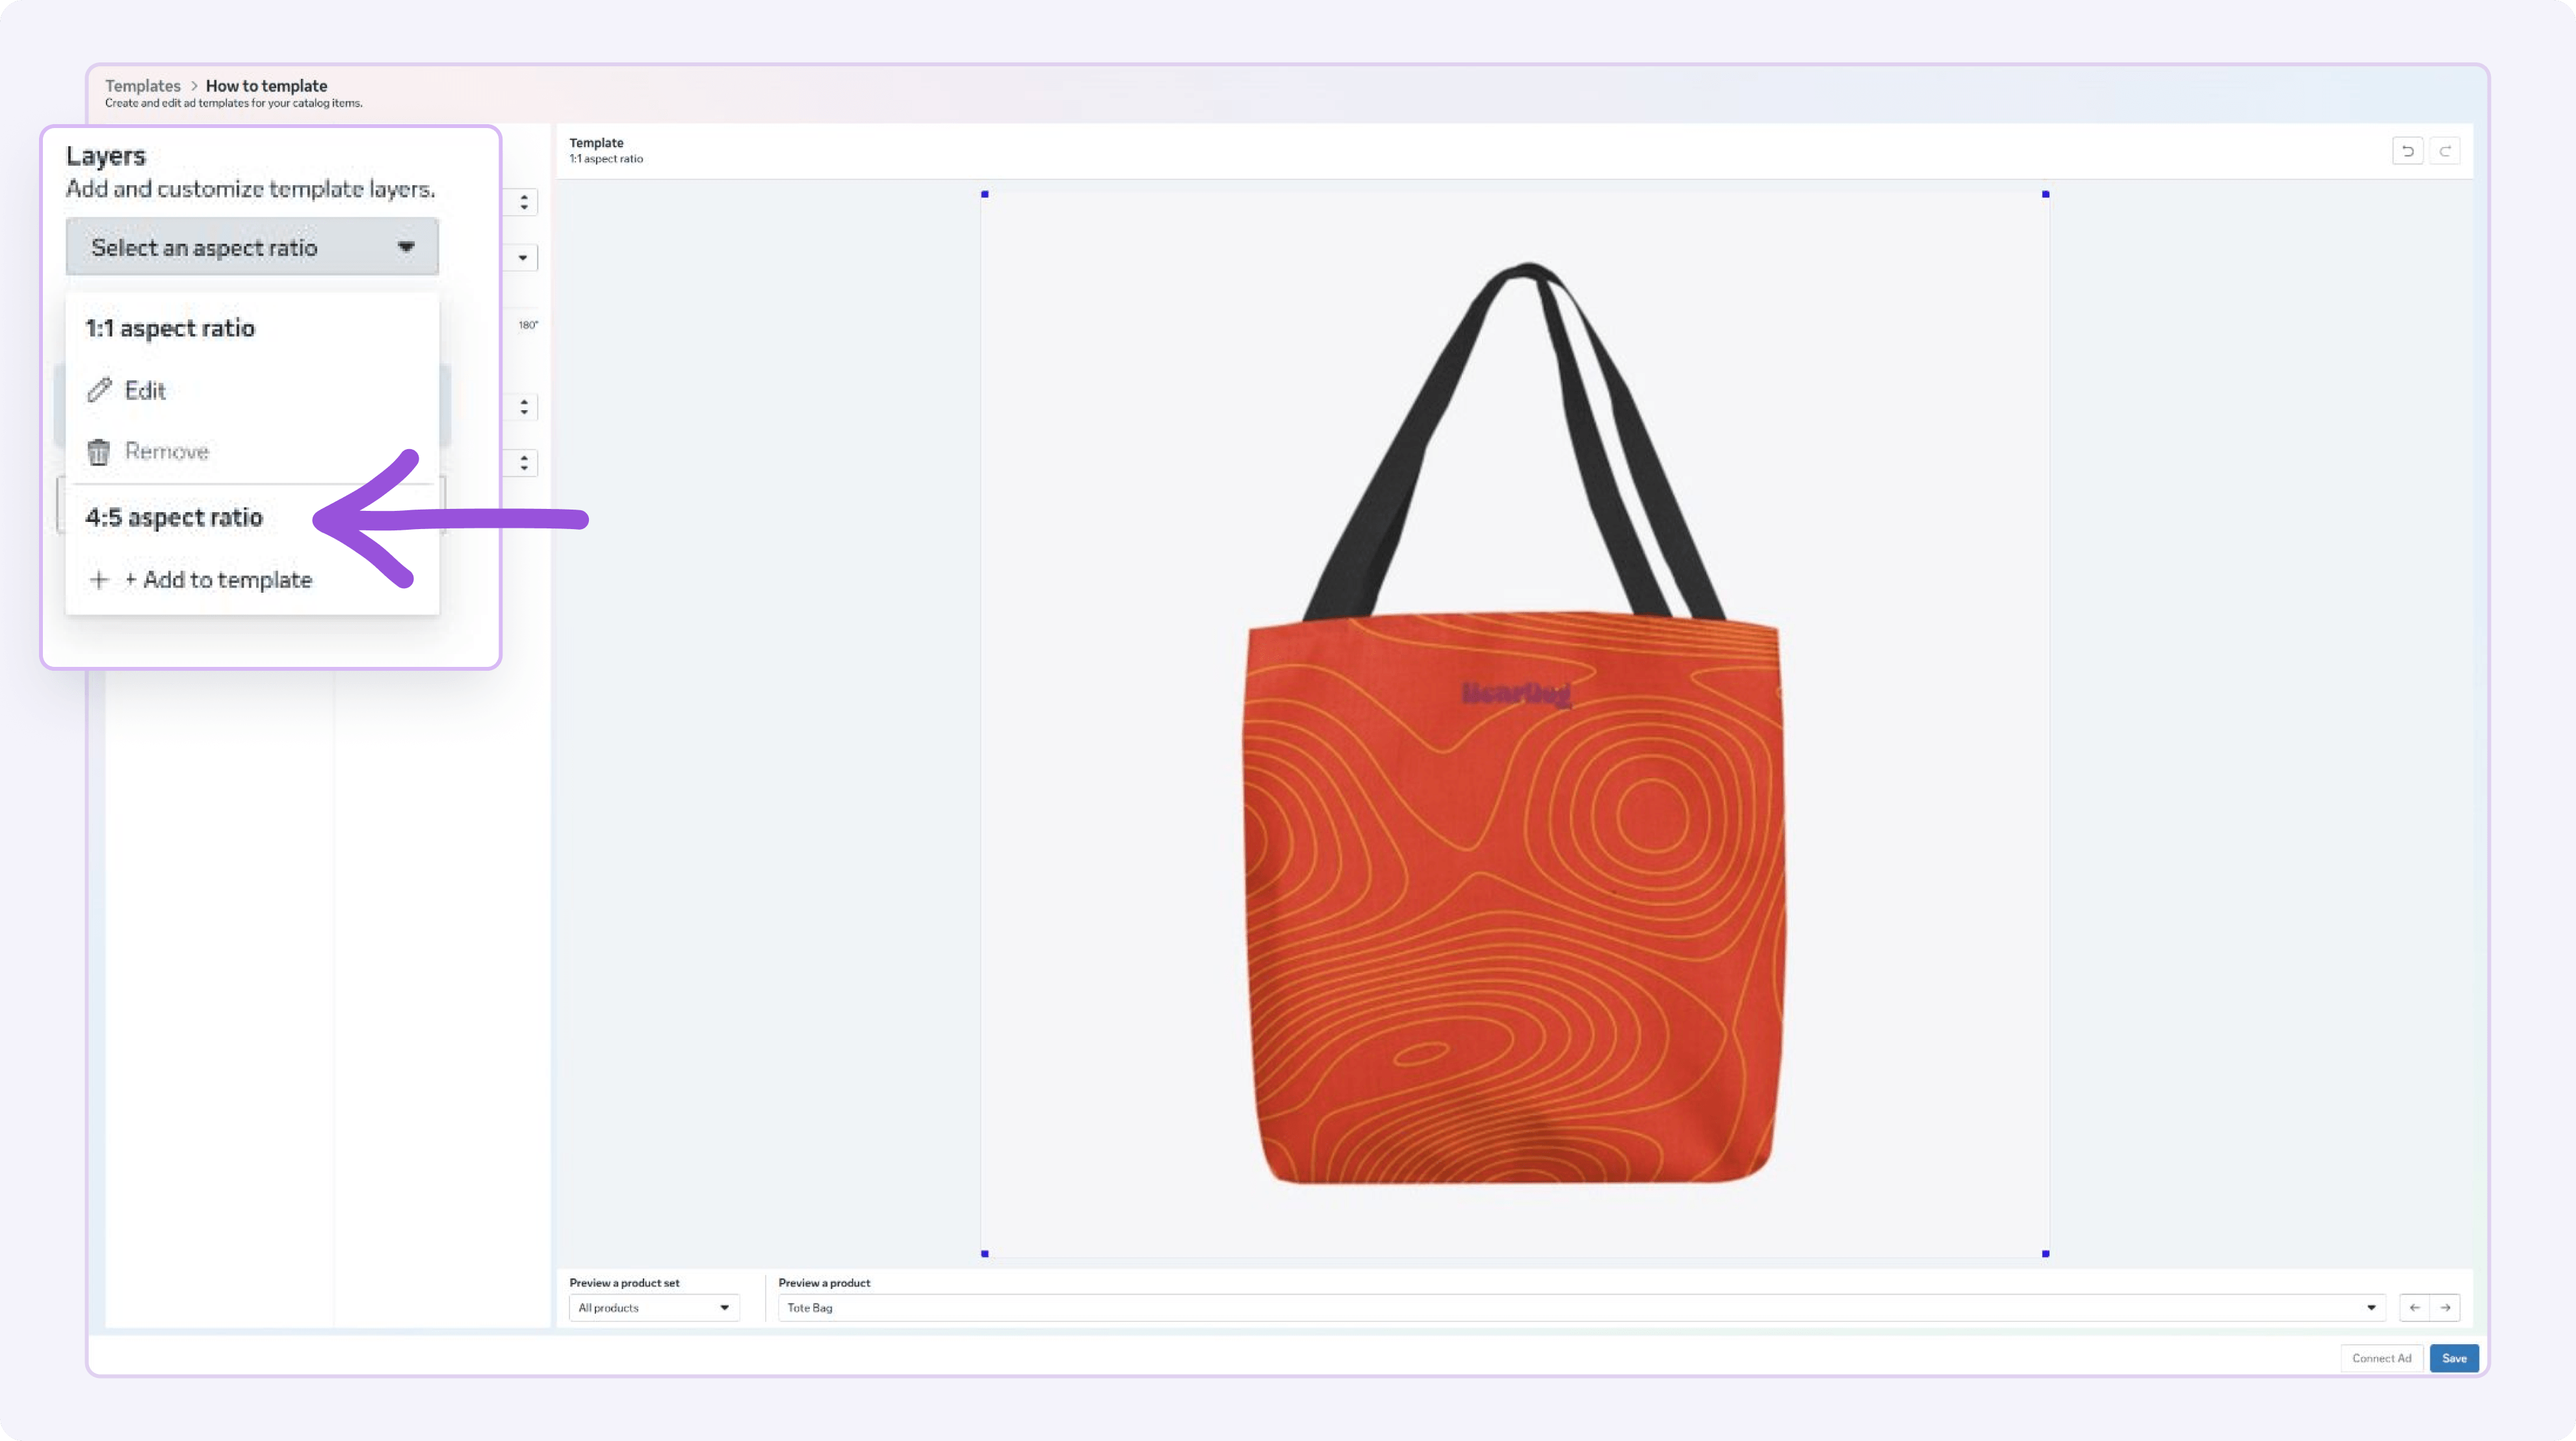
Templates start in 1:1. To add more, click Select an aspect ratio, choose 4:5 or 9:16, and add it to the template. Meta copies your existing design into the new ratio as a starting point, so you adjust instead of rebuilding. Each version then shows on impressions delivered in that ratio: 4:5 in mobile feeds, 9:16 in Stories and Reels.
Don’t skip this step. Vertical formats fill noticeably more of a phone screen than a square does. And in Confect’s Andromeda study, top performers were 75% more likely to run their Catalog Ads in multiple formats than the bottom performers were. Every ratio you add is more screen covered by your design instead of a bare image.
Step 7: Connect your template to your ad
With the template saved, head back to Ads Manager and set up your campaign like you normally would: a catalog campaign, with your catalog and product set chosen at the ad set level. Templates work with Advantage+ Sales and Advantage+ Catalog campaigns.
At the ad level, go to Add an overlay, select Template, and choose the template you built. The design is now applied to every product in your chosen catalog.
Before you publish, check the ad previews across placements. What looks perfect in the editor can still surprise you in a live preview.
And one more thing before you publish anything: there’s a single setting in Ads Manager that can quietly override everything you just built. That’s what the next section is about.
How to build multi-image Catalog Ad templates
A template doesn’t have to show one product image. Add a second Product Layer, and use Image number to pull a different image of the same product: 0 is the product’s first image, 1 is the second, 2 is the third.
This is how you build the layouts fashion brands run: packshot on one side, the product worn by a model on the other. Or for furniture: the full room plus a material close-up.
Two practical notes. First, the extra images come from the additional_image_link attribute in your data source, so check your image coverage there before designing around image number 3. Second, set a backup image on each extra Product Layer, so products with fewer images fall back to the main image instead of an empty spot. Just know the trade-off: when that fallback kicks in, the primary image shows twice in the same design. Fine as a safety net, awkward as a default. Fix thin image coverage in the data source rather than leaning on the backup.
Used well, more angles answer real questions, like how the jacket actually fits. But don’t assume more images automatically mean more performance. We’ll get to the data on that below.
Copy, rename, and delete: managing your templates
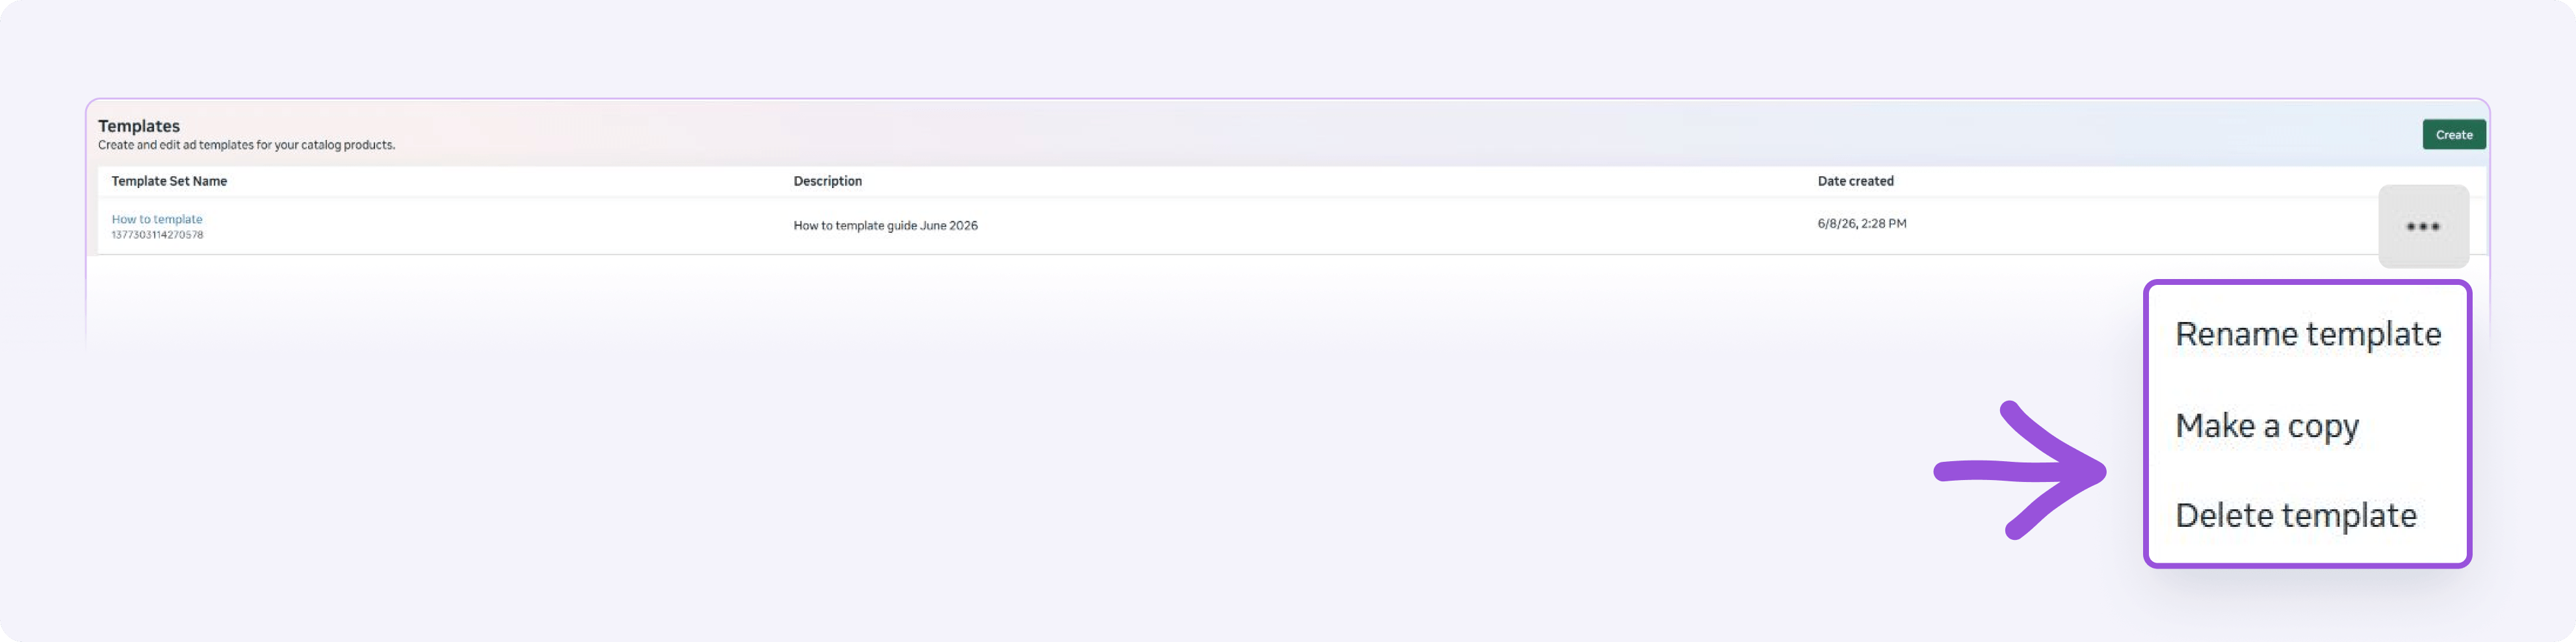
Back in the template overview, the three-dot menu next to each template gives you three options: rename, make a copy, and delete.
Make a copy is the one you’ll use most. Duplicate your evergreen template, swap the background, add a discount sticker, and you have a sale version ready in minutes, without touching the original.
That copy button matters more than it looks, because one template was never the end goal. Later in this post we’ll get into why the best advertisers run several designs at once, and what the data says about it.
Advantage+ Creative enhancements: the one setting that overrides your templates
Here’s the part that surprised us most when we started testing templates.
Meta’s Advantage+ Creative enhancements, the AI features that automatically adjust your ad creative, override your template designs. Image touch-ups and background generation are the worst offenders. Leave them on, and here’s what happens: your template gets applied to part of the image while Meta’s AI reworks the rest. The result is a strange Frankenstein design, half yours, half machine, that nobody approved and nobody would have designed on purpose.
This comes straight from Meta’s own guidance: turn off Advantage+ Creative modifications when using templates. When the two collide, the enhancement wins and your template loses.
And it’s not a one-time fix. Meta turns many of these enhancements on by default, and they have a habit of switching back on when you create new ads or duplicate campaigns. So make it a routine: every time you connect a template to an ad, open the Advantage+ creative settings at the ad level and check that image touch-ups and background generation are off.
To be clear, this applies to every template design, not just Meta’s. Whether your design comes from Meta’s builder or a dedicated design tool, an active enhancement overrides it just the same. This one setting ruins more Catalog Ad designs than anything else, and most advertisers never notice, because the ads keep running. They just run with a design nobody chose.
It’s also why the Confect Chrome extension flags these settings and fixes them directly inside Ads Manager, so Advantage+ doesn’t quietly undo your work.
What to put in your Catalog Ad template: design choices backed by data
Knowing how to build a template is the easy half. Knowing what to put in it is where performance is decided.
Here at Confect, we’ve spent years analyzing what separates Catalog Ads that perform from Catalog Ads that just run, across billions of impressions. We’ve collected the results in the big Catalog Ads design cheat sheet, and the patterns are consistent enough to treat as rules of thumb. Here’s what the data says, and the reasoning behind it.
The design elements that improve Catalog Ad performance
Start with the elements that pay off across nearly every account. All numbers compare Catalog Ads with the element against Catalog Ads without it, measured on Return on Ad Spend.
- Show the price. Price transparency filters out window shoppers before the click and attracts buyers who already accept the number. Ads showing the price perform 31 to 54% better, depending on funnel stage.
- Show the savings. Not just “Sale”, but the actual amount or percentage saved. Specific savings lift performance by 57%, because a concrete number is believable in a way “great deals” never is.
- Use on-sale designs. A dedicated design for discounted products lifts performance by around 50%. The catch in Meta’s builder: nothing switches the sale design on and off automatically, so you manage it by hand. More on that further down.
- Show the category. Telling people what they’re looking at (“Running shoes”, “Office chairs”) sounds almost too simple, but category info lifts performance by 64%. Never assume the product photo explains itself at scroll speed.
- Add social proof. Review scores and ratings reassure people who don’t know your brand yet: +31% on average, and much stronger in prospecting.
- Use custom labels. Delivery promises, stock status, savings amounts: +37%. This is the Catalog Field Layer doing real work.
And a note on quantity: designs with six or more layers perform 38 to 42% better than sparse two-to-three-layer designs. More relevant information means more reasons to buy. The bare product image isn’t minimalist. It’s just empty.
One popular element that pays less than you’d expect: additional product images. On average, showing additional images in the design decreases Return on Ad Spend by 1%, and improves Cost Per Purchase by just 4%. Multi-image templates earn their place in specific situations, fashion above all, not as a default.
Prospecting vs. retargeting: adapt your template to the funnel stage
The same template should not run across the whole funnel, because the person seeing it is in two different situations.
In prospecting, the shopper has never met your brand. They have no reason to trust you, so trust is what the design must build. This is where social proof peaks: review scores lift performance by 58% in top-funnel ads. Your logo, on the other hand, does almost nothing here. Nobody recognizes it yet.
In retargeting, the shopper knows the product and is deciding whether to act. Now the specifics carry the weight: price lifts performance by 54% in bottom-funnel ads, against 31% in prospecting. And the logo starts to pay, +14%, because now it triggers recognition. Right, that shop.
Same catalog, same products, two templates. We’ve covered both situations in depth: Catalog Ads in top-funnel ads and prospecting and Catalog Ads in bottom-funnel ads and retargeting.
High-end vs. affordable: adapt your template to your brand type
Price and discounts don’t work equally for every brand. They work hardest where the deal is the argument.
For affordable brands, price is the pitch. Showing it lifts performance by 60%, and showing discounts lifts it by 115%. Your customer is hunting value, so the design should hand it to them.
For high-end brands, the same elements still help, but less: +35% for price, +24% for discounts. A luxury buyer isn’t scanning for the cheapest option, and a screaming discount splash can undercut the exact exclusivity they’re paying for. Design quieter: more space, fewer elements, let the product carry the ad.
Mid-range brands sit between, at +43% for price and +73% for discounts.
If you’re at the premium end, Catalog Ads for high-end and luxury brands covers how to design without cheapening the brand.
Catalog Ad templates by industry: fashion, electronics, home, and more
On top of funnel stage and brand type, industries have their own patterns. The short versions:
- Fashion: the product worn beats the product flat. Multi-image templates with a packshot plus an on-model shot answer the only question that matters: how does it look on? More in Using Catalog Ads as a fashion brand.
- Electronics: specs sell. Use custom labels to surface the details buyers compare, and consider financing or warranty messaging to remove price friction. More in Using Catalog Ads as an Electronics brand.
- Home and lifestyle: context is everything. Show the product in a room, not in a void; a sofa floating on white answers nothing. More in Using Catalog Ads as a Home & Lifestyle brand.
- Sports and fitness: the product in use, plus social proof. Bestseller badges work hard in a category where people copy what others train in. More in Using Catalog Ads as a Sports & Fitness brand.
Example: a strong beginner Catalog Ad template, layer by layer
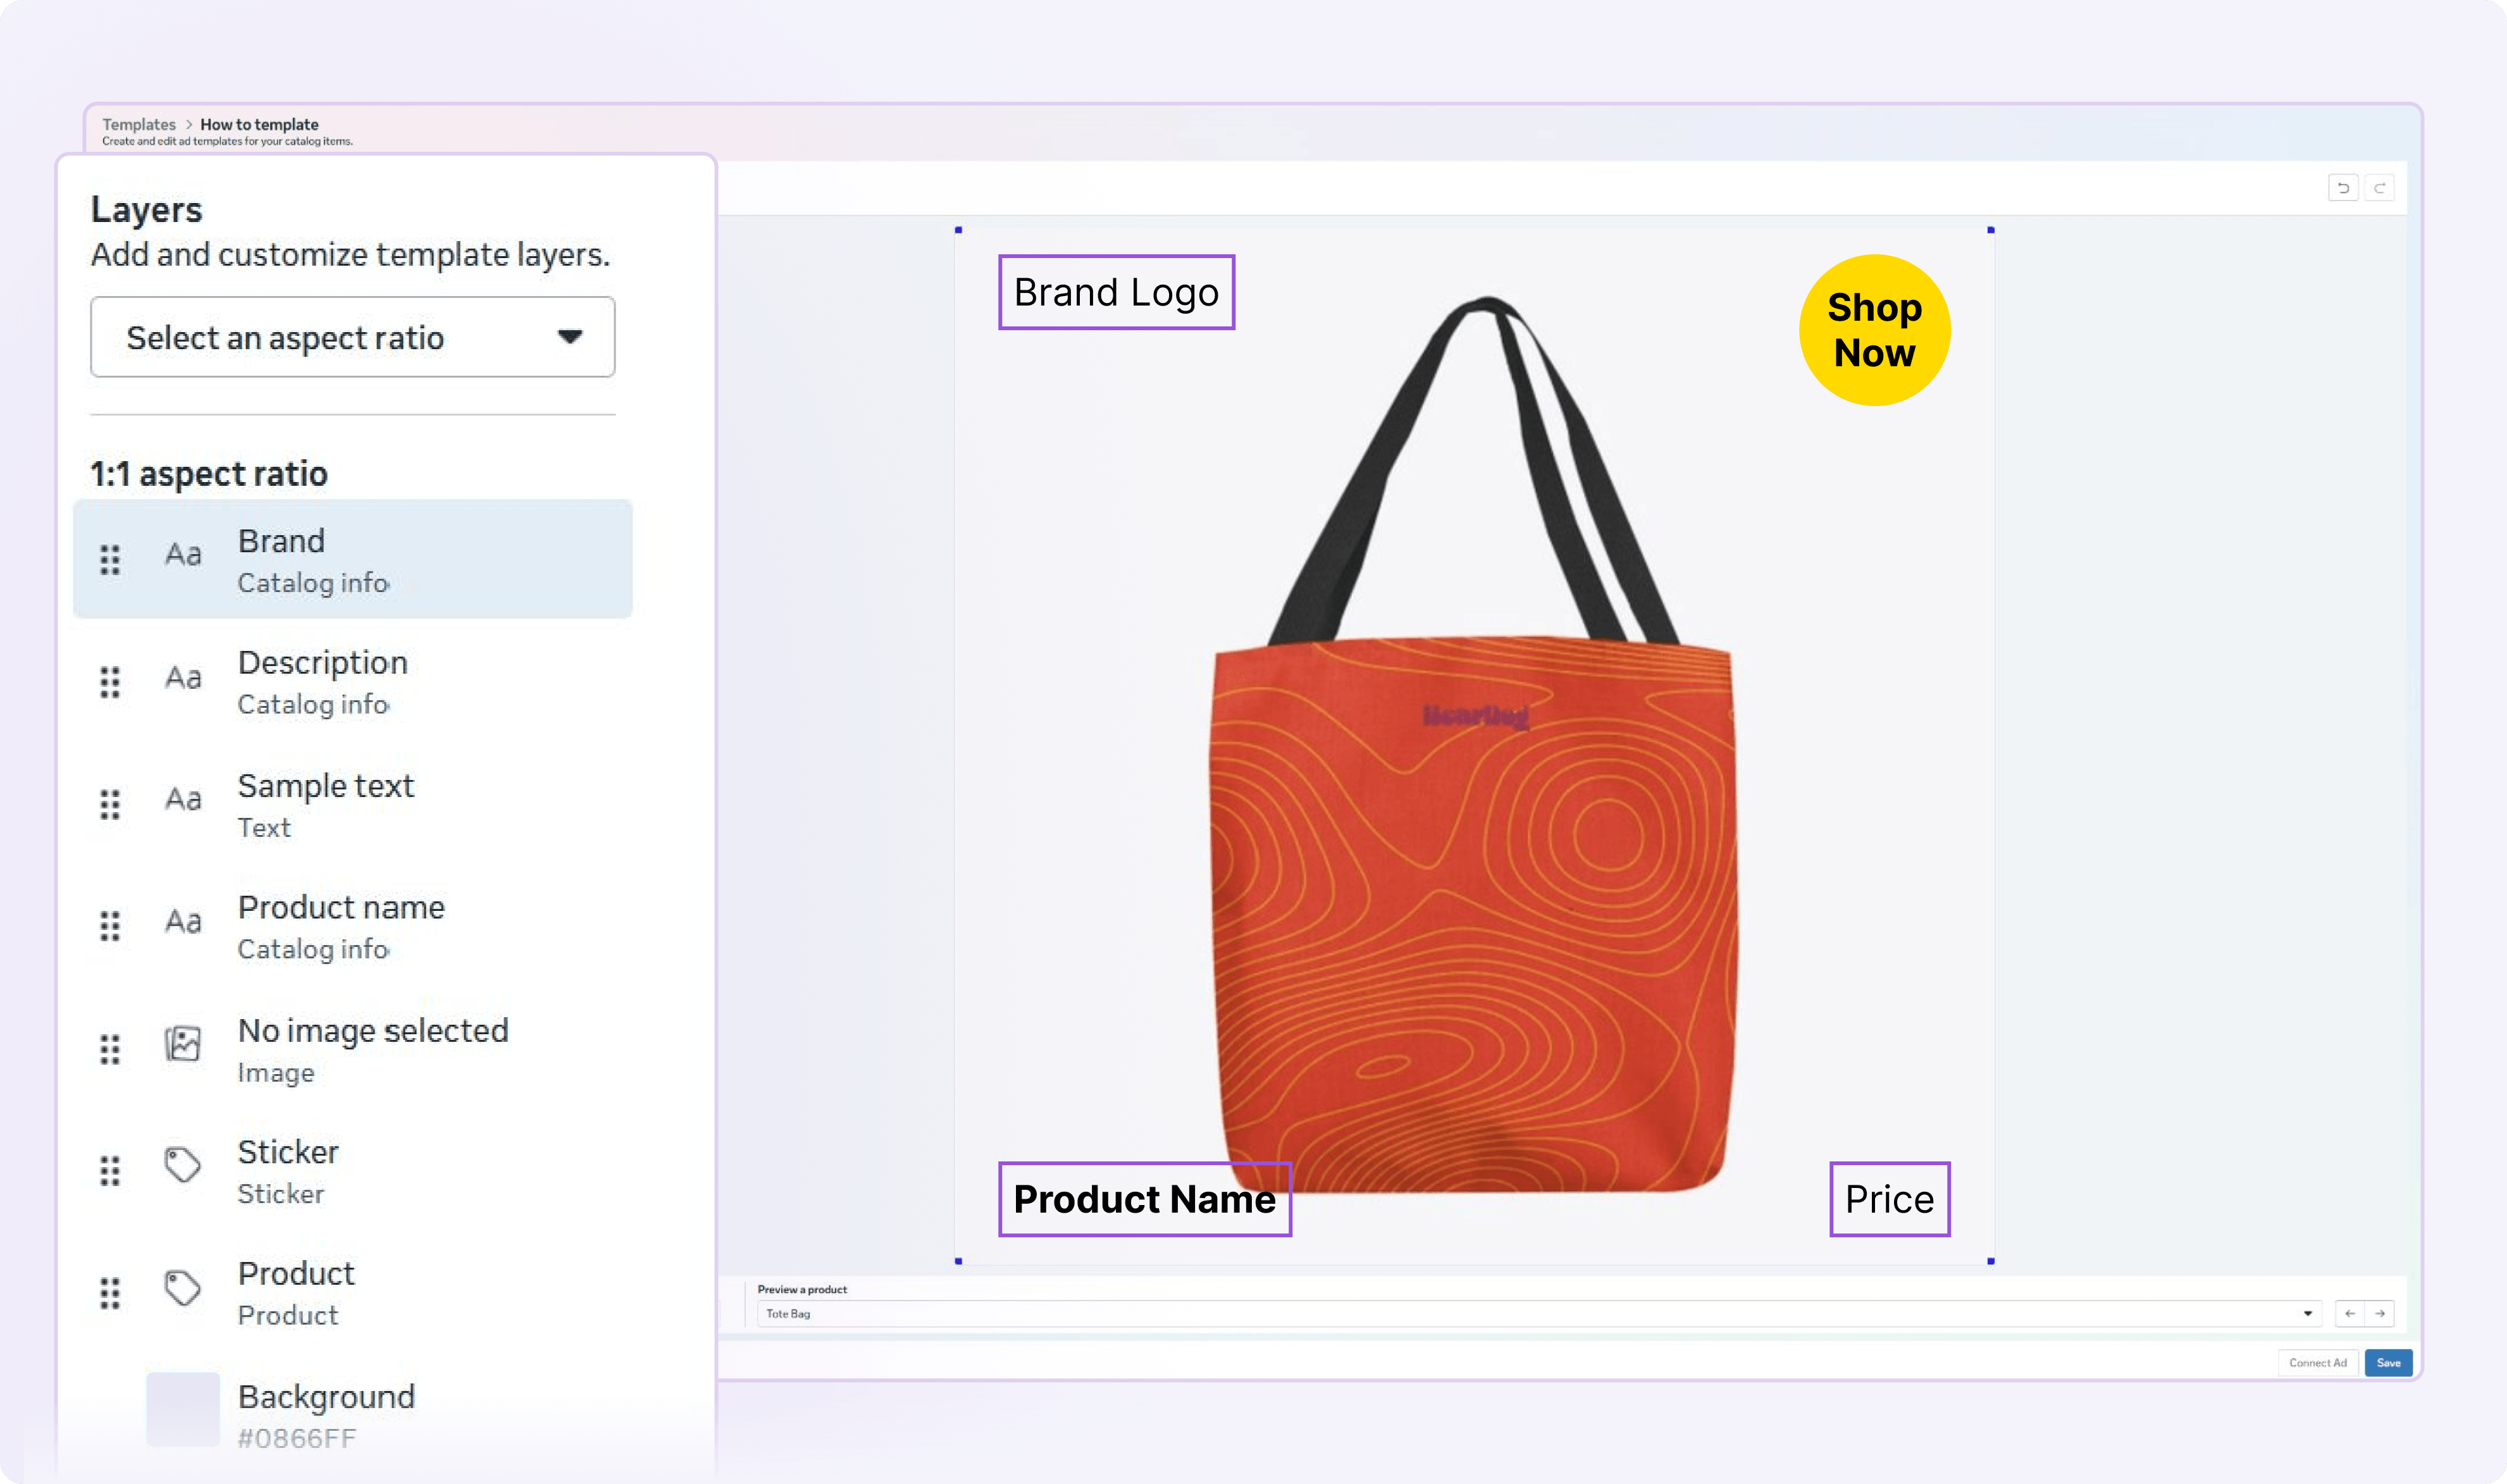
Let’s put it together. A solid beginner template, evergreen and safe, built from the layers you now know:
- Background Layer in your brand color. Recognition before reading.
- Product Layer, large and centered. The hero.
- Image Layer with your logo in the top left corner.
- Catalog Field Layers for product name and price along the bottom.
- A Sticker Layer in a contrasting color, top right, with a Catalog Field on top pulling a custom label: the review score.
That’s seven layers, right in the range where designs outperform. And the layout follows the path eyes naturally travel across an image, the Z-pattern: enter at the logo top left, land on the product in the middle, exit at the price bottom right. The design isn’t decoration. It’s a reading order.
Flip through your product previews, adjust for the awkward products, save, connect. Done.
Why you should build more than one template
One good template beats none. Several beat one.
In Confect’s Andromeda study, top performers were 38% more likely to run five or more design variants than bottom performers. The reason is mechanical: Meta’s delivery system matches creative to people, and every distinct design you give it is another option to match with the right person. One template gives the algorithm nothing to choose between.
This is what the Make a copy button is for. Duplicate your evergreen template, change the background, swap the badge, reframe the message. Ten minutes per variant.
Then run them in separate ads and let delivery decide. We’ve written a guide on using multiple designs in Meta ads if you want the setup.
What Meta Catalog Ad Templates can’t do
We’ve spent this whole post showing you how to use Meta’s template builder, and we meant every word: if your Catalog Ads are bare product images today, start building templates this week.
But we’d be lying if we said the native tool is the end of the road. Here’s an honest look at where it stops.
What the native template builder does well
Credit where it’s due. The builder is free. It sits inside the tools you already use, with no extra platform to learn and no changes to your data source. And the layer system is genuinely capable: dynamic catalog fields, multi-image layouts, real font choices, starter templates.
For an advertiser who has never designed a Catalog Ad, this is the best on-ramp Meta has ever offered. It removes the last excuse for running bare product images.
But let’s be honest about the ceiling. Even with all six layer types, it’s difficult to build designs in here that genuinely look like your brand. The fonts are limited, the text controls are basic, and the polish of your Photoshop or Canva ads isn’t reachable. That’s why we mostly recommend the native builder to smaller brands. For bigger brands, where every ad is a brand touchpoint, a dedicated tool like Confect is the realistic path to on-brand Catalog Ads.
For many smaller accounts, though, it will be enough for a while. The gaps below start to matter when Catalog Ads become a serious share of your revenue.
Design Rules: the missing feature that separates top performers
A Meta template is static logic: one design, applied to every product in the ad, always.
But your catalog isn’t static. Some products are on sale and some aren’t. Some are bestsellers, some are new, some are premium. A single design treats them all identically, which means the sale products don’t shout and the premium products don’t whisper.
This is what Design Rules solve: conditional logic in the design itself. A few examples of what that looks like in practice:
- If the product is on sale, show the sale design with the savings amount. Full-price products keep the clean evergreen design.
- If the product is a bestseller, add the bestseller badge.
- If the product is new, show the “New arrival” design for its first weeks.
- If the product costs more than a set amount, switch to a quieter premium design with more space and no splash.
- If the product belongs to a certain category, use the design built for it: one look for running shoes, another for jackets.
- If Black Friday starts at midnight, switch every ad to the Black Friday design automatically, and switch back when it ends. The same goes for any campaign you can put in a calendar.
All of it happens inside the existing ads. No edits, no republishing, no waiting.
Meta’s template builder has nothing like this. If you want a sale design in the native tool, you build a separate template and manually swap it on the ad. And that swap carries a hidden cost: editing a live ad restarts Meta’s learning phase, so every manual design change sets your delivery back while the algorithm relearns. Rules-based design changes don’t, because the ad itself never changes. Your Black Friday design goes live at midnight with the learning phase intact.
And here’s why this gap matters more than any other: in Confect’s Andromeda study, using Design Rules was the single biggest behavioral difference between top and bottom performers. Top performers were 103% more likely to use them, a bigger gap than variants, formats, or any other feature we measured. Advertisers running one design rule saw 69% higher Return on Ad Spend than those with none. Two or more rules: 94% higher.
The most valuable capability in Catalog Ad design right now is the one the native tool doesn’t have.
Video Catalog Ads, Collection ads, and the other gaps
Design Rules are the biggest gap, but not the only one.
Templates are static images. Designed Video Catalog Ads, where every product gets its own designed video, deliver 41% higher Return on Ad Spend and 45% lower cost per purchase, and in the Andromeda study top performers were 62% more likely to run them. The native builder can’t make one.
Collection ads are excluded from templates entirely, so one of Meta’s strongest eCommerce formats keeps showing bare product images.
There’s no background removal either. The only background feature Meta offers is the AI background generation in Advantage+ Creative, and it’s not compatible with templates: turn it on and it overrides your design, replacing your layout with an AI-generated backdrop that tends to look exactly like what it is.
Then the daily-work gaps: custom fonts only through a Meta rep, no text formatting like rounding prices or removing decimals, and designs that live only on Meta, when the same products could carry designs to TikTok, Pinterest, Snapchat, and your email flows.
This is where a dedicated tool stops being a nice-to-have. In Confect’s design editor, you build with the same freedom as your Photoshop or Canva ads: any font, your exact colors, complex layered layouts, background removal built in. Your Catalog Ads finally look like your normal ads instead of a compromise.
You also get to use everything you know about your products. All your product data can go into the design, not just a handful of fields, and Product Assets turn that data into visuals: brand logos, rating stars, energy labels, country flags, shown automatically on the right products. Catalog Ads with Product Assets reach 80% higher Return on Ad Spend on average. Scheduled Design Rules put your whole campaign calendar on autopilot, months in advance.
And because Confect tracks how each design performs, you see which design choices drive results and keep improving. That might be the most underrated difference of all: Meta’s builder gives you no data about your templates. You can’t improve what you can’t measure.
When to move to a dedicated Catalog Ad design tool
Our honest rule of thumb: around $5,000 per month in Catalog Ad spend.
Below that, Meta’s builder is the right move. Build your templates, turn off the enhancements, learn what design does for your numbers. You’ll already be ahead of most advertisers, who are still running bare images. Brand size matters here too: for smaller brands, the native builder’s design ceiling is a fair trade for free. For bigger brands, it rarely is.
Above it, the math changes. At $5k a month, the difference between a static template and a rules-driven, variant-tested, multi-format design setup is no longer a rounding error. It’s real revenue, every month, compounding.
That’s the level where the results start looking like Arena Sports, who lifted Return on Ad Spend by 34% with designed Catalog Ads, or Vero Moda, who grew Catalog Ads sales by 60%.
So the ladder looks like this: bare images, then Meta’s templates, then a dedicated tool. Just don’t stand still on the first rung. That one costs you money every single day.
From Dynamic Product Ads to Templates: how Catalog Ad design evolved
To appreciate what Templates actually is, it helps to see what came before.
In 2015, Meta (then Facebook) launched Dynamic Product Ads: ads that pulled products from a catalog and automatically showed the right one to the right person. The targeting was brilliant. The creative was nonexistent. Every ad showed the raw product image from the data source, and there was no way to change it.
A couple of years later came the first patch: Catalog Ad frames and overlays. You could upload one image, typically a frame with your logo, and place a single price or discount splash on top of the product photo. It helped, barely. One static image, one piece of product info, a handful of fixed positions, and the frames didn’t even show on Instagram placements. Every advertiser’s overlay looked like every other advertiser’s overlay.
That gap is what dedicated design tools were built to fill. From around 2018, tools like Confect offered full design control over Catalog Ads: layers, dynamic fields, rules, video. In 2023, Meta renamed Dynamic Ads to Advantage+ catalog ads and pointed its AI at the format. And in 2026, Templates arrived: Meta’s first real native design tool for Catalog Ads, roughly eight years after dedicated tools made it possible.
Every step has moved in one direction. The most data-rich ad format on Meta was never going to stay undesigned forever, and now the platform itself has confirmed it. With Templates, there is no longer any version of “we can’t design our Catalog Ads.”
Meta Catalog Ad Templates: frequently asked questions
Are Meta Catalog Ad Templates free?
Yes. The template builder is included in Ads Manager and Commerce Manager at no extra cost. The one exception is custom brand fonts, which require a request through your Meta rep and are typically reserved for larger advertisers.
Do Catalog Ad Templates work with Advantage+ Creative enhancements?
They run together, but they shouldn’t. Advantage+ Creative enhancements, especially image touch-ups and background generation, override template designs. Meta’s own guidance is to turn these enhancements off when using templates, and to check them on every new ad, because several are on by default.
Which aspect ratios do Meta Catalog Ad Templates support?
Templates support 1:1 (square), 4:5 (vertical feed), and 9:16 (Stories and Reels). You build each aspect ratio version inside the same template, and each one applies to impressions delivered in that ratio.
Do Catalog Ad Templates work with Collection ads?
No. Templates support the formats that work with 1:1 and 4:5, such as single image and carousel, but Collection ads are excluded. Collection campaigns keep showing your standard product images.
What is the difference between Catalog Ad frames, overlays, and templates?
Frames and overlays are the old tools: a frame is a single image placed over every product photo, and an overlay is one piece of price or discount info in a fixed shape. Templates replace both with a full design canvas where you combine multiple layers: product images, dynamic catalog fields, text, logos, shapes, and backgrounds.
Can I use my own brand fonts in Catalog Ad Templates?
Meta offers 26 fonts, including Lato, Montserrat, Open Sans, Poppins, and Roboto. Custom brand fonts are possible, but only by request through a Meta rep, and generally only for larger advertisers. Everyone else picks the closest available match.
Do Catalog Ad Templates work with Advantage+ Shopping campaigns?
Yes. Templates work with Advantage+ Sales campaigns (the current name for Advantage+ Shopping) and Advantage+ Catalog campaigns. You connect the template at the ad level under Add an overlay.
How are Meta Catalog Ad Templates different from dedicated Catalog Ad design tools?
Meta’s builder creates static designs with basic controls, one template per ad, and no performance data. Dedicated tools like Confect add what’s missing: conditional Design Rules, Video Catalog Ads, Collection support, design variants for testing, background removal, all your fonts and product data, design performance insights, and designs that follow your products to other channels. Meta’s tool is the right starting point, especially for smaller brands. Dedicated tools are how top performers run the format.
Start designing your Catalog Ads today
Here’s the uncomfortable truth this feature exposes: bare Catalog Ads were always a choice. Now they’re an inexcusable one.
The builder is sitting in your Ads Manager. Open it this week, build one template with the elements that pay (price, savings, category, social proof), turn off the Advantage+ enhancements, and let it run against your old ads. Design will do the rest.
And when Catalog Ads grow into a serious revenue channel for you, past that $5k a month mark, you’ll know exactly where to take it next.
Either way, the era of the bare product image is over. For a weekly look at what great Catalog Ad design looks like in the wild, see our Catalog Ad of the Week.